Table of Contents
Pre MerCruiser Intake Manifold Installation
This is the process of preforming MerCruiser Intake Manifold installation. Firstly, there are two Manifolds because there is an upper and lower intake. Before installing the lower intake, we have to finish setting the valve lash. Below is a chart I found of what valves have to be adjusted depending on whether cylinder one is a Top Dead Center (Black Circles) or Cylinder Six (Ed Circles). We are at Top Dead Center on Cylinder one currently.
Setting the initial Valve lash to zero and lifters preloaded

Valve Lash Order MerCruiser Intake Manifolds Installation
We will start with Cylinder one at Top Dead Center Next, I put assembly lube on the rocker arm and pushrod. I will put each rocker arm nut on loosely. Start at Cylinder one Exhaust. I then adjust the rocker arm bolt down until there is just a little drag on the pushrod while spinning the pushrod in between my thumb and forefinger. Secondly, follow the sequence of the remaining valves as indicated by the black circles. All we are doing here is setting the rockers to zero lash, nothing more at this point. This will get half the engine done.
We will then rotate the engine three hundred and sixty degrees. This is to get cylinder six to top dead center on the compression stroke, and it is 360 degrees from cylinder one. Before we can start with the MerCruiser Intake manifold installation we have to set the rest of the rockers and valve lash. So let’s started!
Checking and setting the rest of the Valve lash to zero and lifters preloaded
To start, I had a major setback due to me getting my COVID shot. As a result, there are not any really good videos of me doing this. Firstly, we check what we have done before. I’m kind of nervous about getting this right. So spin the motor over three hundred sixty degrees to get cylinder six at Top Dead Center. Next, I put assembly lube on the rocker arm and pushrod. I will put each rocker arm nut on loosely. I then adjust the rocker arm bolt down until there is just a little drag on the pushrod while spinning the pushrod in between my thumb and forefinger. Secondly, adjust the lash on the remaining valves. Finally, rotate the engine in 90-degree increments till I get two full revolutions or eight rotations.
Next, I will be checking for any excessive rocker arm lash throughout this process. At this point, the order is not a concern at this point. I’m not going to put in more than 1/4 to 1/2 a round past zero lash for preloading. The Manual says one round. So finally, go through all the rocker arm nuts and add 1/4 to 1 round to each. Additionally, I hope I get this right! I’m familiar with overhead cam engines with hydraulic lifters. Nothing to really adjust on those! I have seen a few how-to videos and articles. Lastly, If I get it right it will start up without any issues. Now on to the MerCruiser Intake Manifold Installation.
Installing MerCruiser Intake Manifold (Lower)
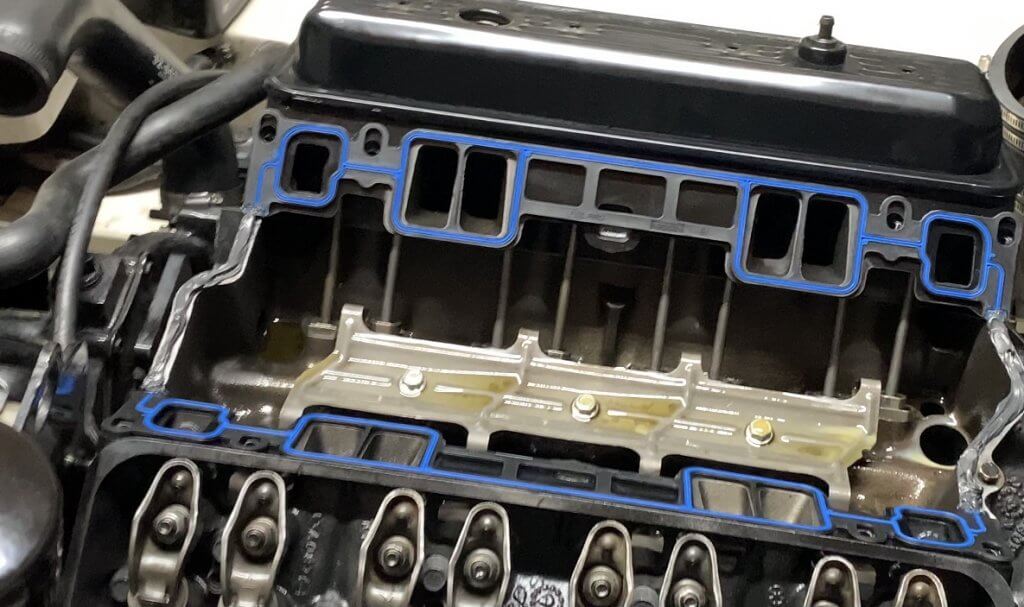
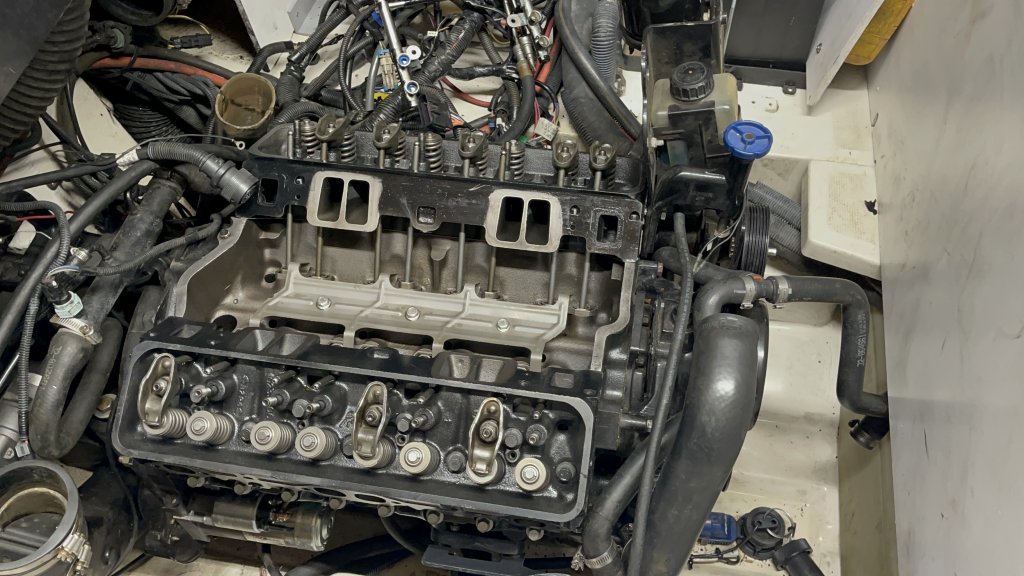
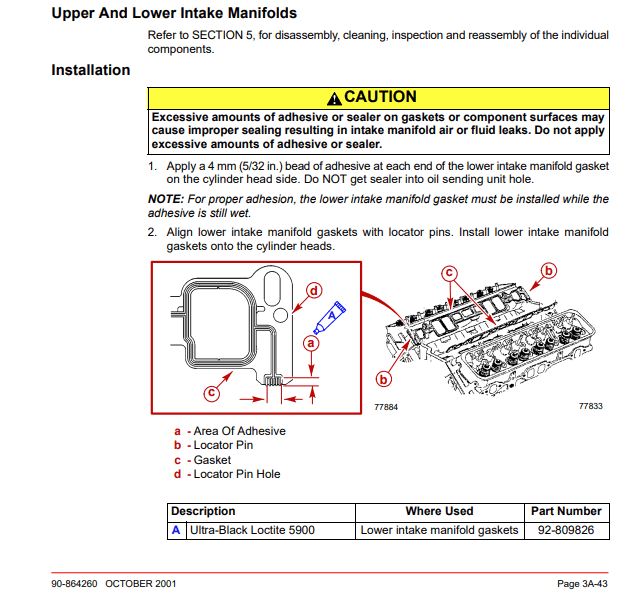
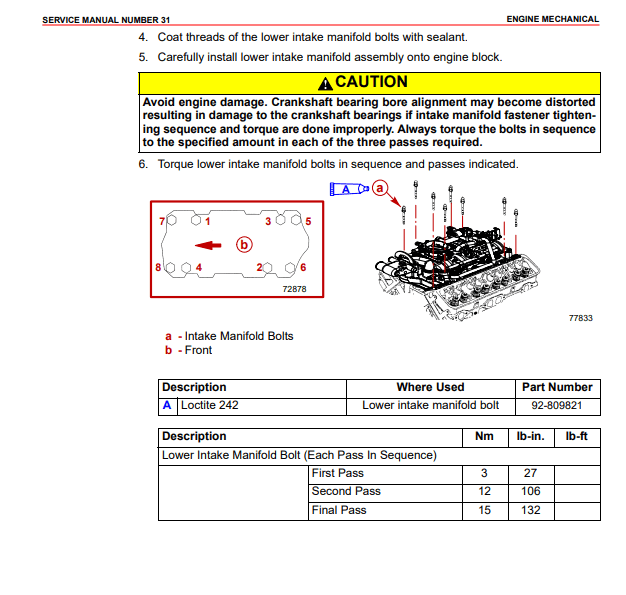
To start, I pour about a gallon of oil into the the lifter valley. Secondly, we will need to install the intake gasket and run a bead of RTV sealant on the front and rear of the engine block where the lower manifold meets the cylinder block. Additionally, we will need to add about 1/2 an inch of sealant on the front intake manifold gaskets. In the above picture, you can see the RTV sealant on the front and rear. What is not there is the 1/2 bead of sealant halfway up the front intake gasket. Please, follow the process outlined in the service manual and maybe read the next page to make sure you haven’t missed anything relevant like I did! I used some fast-setting Permatex Black. I’ve add the details out of the manual below.
Lower-Intake-1 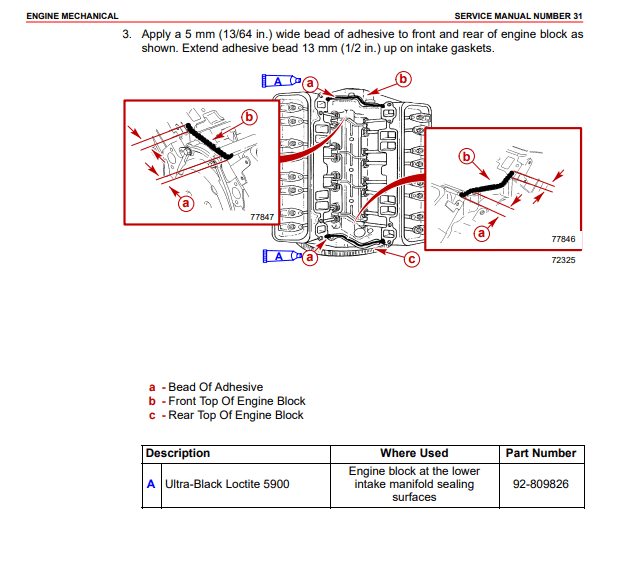
Lower-Intake-2
Firstly, keep in mind the lower intake is of significant in weight. I was able to wrestle it over the stern of the boat and into place. I got it into place and installed the new bolts. There is a specific torque sequence to these bolts. I did it backwards, but it should work. I did these in three sequences to ensure that I got this right, just like the head bolts.
MerCruiser Intake Manifold Installation (Upper)
So the next step was to install the upper intake manifold. be aware, there is a rubber gasket that has to be installed. Installed the screws and torqued down to the correct specification in the manual. In addition, we will install :
- MAP/MAT sensors
- Valve covers (port/Starboard)
- Install new injectors into the fuel rail
Install the distributor
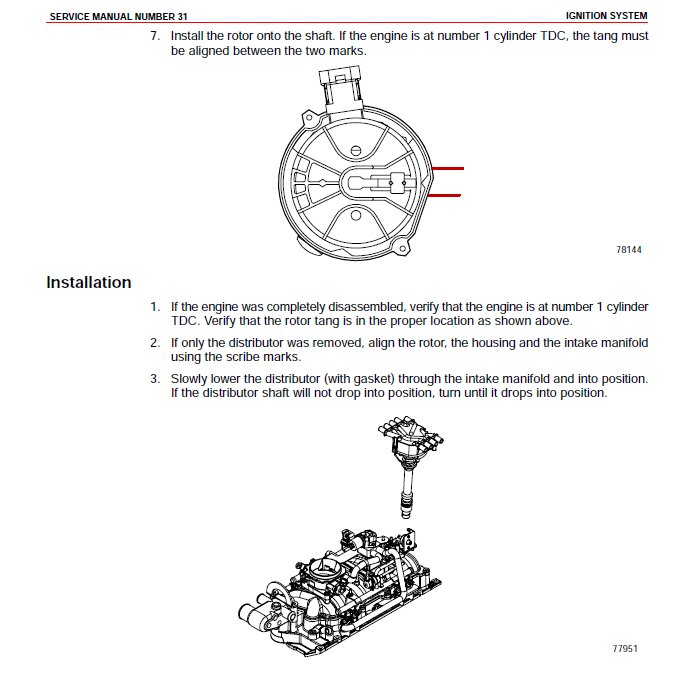
Firstly, before we proceed any further, beyond what is above we will need to get the engine retimed. This is basically the reverse of the removal. Secondly, set the engine to Top Dead Center and get the oil pump lined up to the bottom of the distributor and drop into place and tighten the distributer lock down bolt. Lastly, It should line up to the number one position on the distributer. See the below diagram!
Install the remaining items
Finally, we have to install the remaining items we removed as part of the disassembly process. Basically this is the reverse of the removal process.
- Alternator Bracket, and related brackets
- Reconnect alternator and starter wiring thermostat housing
- Front Lift Bracket
- Rear Lift Bracket
- Throttle Body
- Idle Air Controller & Throttle position sensor
- Fuel Rail & Connect injectors
- Thermostat housing & related wiring (ECT & CPS)
- Relay bracket
- Exhaust manifolds and risers
- ECU and related bracket
- Ignition Coil & Bracket
- Fourteen Pin Connector & New and Existing SmartCraft Gauge’s
Its all back together now!
So with the engine back together with the exception of captains call, the next step is to see if this motor will start!