So we are about three months into 2022, and I have again made a slight detour. First, we are working out the kinks getting our fuel tanks to show up on the RayMarine MFD. Additionally, its getting time to get back on the water and I have some issues at hand. So in typical Ravi fashion, I have decided I want an RayMarine autopilot installed ahead of everything else I’m working on. So these are the RayMarine Autopilot Preinstall requirements. One of the major things I dislike is a lack of a rudder indicator. Counting revolutions and a piece of tape is just not going to cut it. Especially, having to do maneuvers under stress or scrambling.
RayMarine Autopilot Install, a slight detour?
So, a detour, really! First, where things kind of went off track is when I went to start the boat over the winter. I had to tap on the analog gauges to get them to respond. Naturally, you are going to ask how do we get to a Raymarine Autopilot installation? Simple, now that I have the Fox Marine Engine Gateways in. I can get data to digital gauges. That lead to me purchasing an i50 an two i70’s. That lead me down the rabbit hole of if I have that data why not address the issue with the rudder indicator? Lastly, that begged the question as to how more would it take to get a RayMarine autopilot installed? answer, not much more, just more money and time.
So, not much more, you sure ?
So, to start. The rudder Transducer / indicator needs and RayMarine ITC-5. Second, the ITC-5 just takes a bunch of analog data and throws it on the SeaTalk bus. It’s a legacy product to say the least. Furthermore, that led to the RayMarine ACU-150, ACU-200. Then after some research, that ended me up at the RayMarine ACU-300. These are some of the parts I already had:
- Rotary Rudder Reference Transducer – RayMarine
- Two RayMarine I70 – Optional (eBay)
- RayMarine I50 – Optional (eBay)
These parts above are what can be used for our auto pilot install. So lets figure out what type of pump we will need. This will dictate the rest of the systems. There is a ton of information from RayMarine on their website and videos. I’ve been pondering this for a while. I initially was going to start with a kit. In hindsight, it may have been a better idea? But I don’t usually buy a kit of anything. My stumbling point was the autopilot pump. Furthermore, this is where I will start. The autopilot pump, let’s dive into that further.
RayMarine Autopilot Install – Autopilot Pump Type Selection
Firstly, let’s start by sizing the autopilot pump. I’m going to start off by stating that we are doing an install on an inboard power boat (Silverton 353MY). Secondly, you will need to know the fluid displacement of your hydraulic steering ram. In my case I have a SeaStar BA150-7ATM Hydraulic Ram. I got this off the Hydraulic Ram itself. So it was straight forward for me. Thirdly, If you don’t have that you are going to need to find out the ram capacity in cc’s or cubic inches; mine is 10.2 CU inches or 167 CC. Furthermore in my case the the RayMarine reference chart for the auto pilot says I can use a a type 1 or type 2 pump.
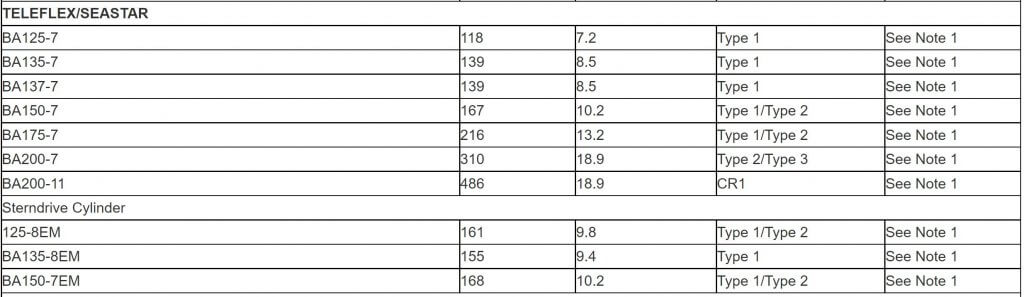
So, note 1 states that we can use either a type one or type two pump. First, where the choice of two or more pumps are indicated the type, displacement and steering characteristics of the vessel should be considered. By choosing the larger pump with an increased flow rate a faster hardover time can be achieved, which on some vessels will result in improved Autopilot helm response and course keeping. Additionally, this is directly from RayMarine and the link above. So lets dive into the pump section based upon the hardover time
Autopilot Pump Type Selection – Hardover Calcualtion
First, lets review. My SeaStar Hydraulic Cylinder Ram Size is 167 Cubic Centimeters. Secondly, what I know is I don’t need to use a RayMarine hydraulic pump. So I did a bit of searching on forums and found this pump manufacture. SeaStar makes one too!
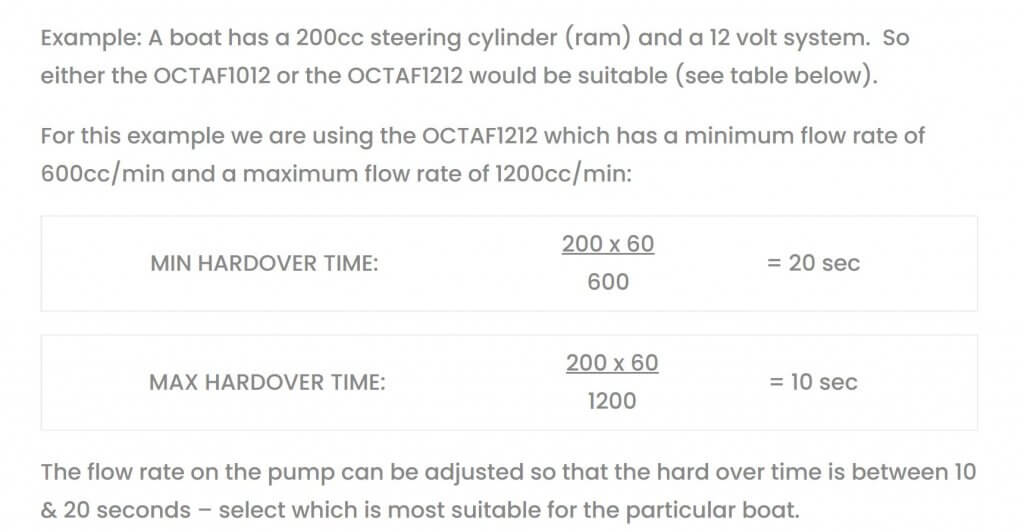
So based on the math, which I don’t do very well, below are the calculations.
- Min Hardover Time – (167*60)/600 = 16.7 Seconds
- Max Hardover Time &(167*60)/1200 = 8.35 Seconds
This is based on the Model 1212 or a 1.2 Liter pump. Additionally, these Octopus Pumps are supposedly great from the specifications. They have twice the flow rates at half the power consumption . So I’m going to pick an adjustable hydraulic piston pump from the below chart. Take a look at the normal steer current AMPS. The RayMarine is 8-10 vs the Octopus 1212 is 4-6, just about half. The price is reasonable too. They are around half the price of a RayMarine type two pump.
Autopilot Pump Type Selection – Octopus 1212 -18CI
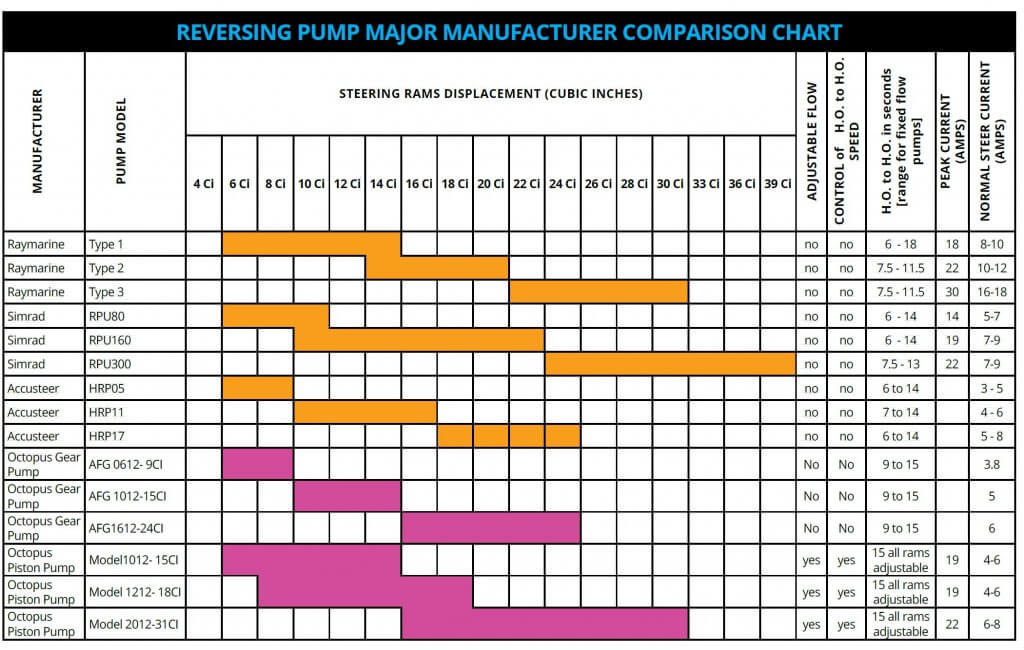
First, you will notice there are a bunch of different manufactures here. There is the Raymarine Type 2, and the Octopus 121-18CI. This it the pump I’m goin to go with.
RayMarine Autopilot Install, a kit selection or no kit?
So with me choosing to go with an non RayMarine pump. This opens up some possibilities. Additionally, what this does, is it moves me from buying a kit. I had a few kit choices and that may be a choice for you. I chose differently. So let me go though them:
- Raymarine EV-150 Power Evolution Autopilot (Type One Pump)
- EV-1 Sensor Core
- p70Rs Autopilot Control Head
- ACU-150 Actuator Control Unit (Does no Include the M81105 Rotary Rudder Reference)
- $1599 (No Pump)
- Raymarine EV-200 Power Evolution Autopilot (Type Two Pump)
- EV-1 Sensor Core
- p70Rs Autopilot Control Head (Don’t Need)
- ACU-200 Actuator Control Unit (Includes the M81105 Rotary Rudder Reference) (Don’t Need)
- $2199 (No Pump)
- Raymarine EV-300 Power Evolution Autopilot (Type Three Pump)
- EV-1 Sensor Core
- p70Rs Autopilot Control Head (Don’t Need)
- ACU-300 Actuator Control Unit (Includes the M81105 Rotary Rudder Reference) (Don’t Need)
- $3199 (No Pump)
First, I can’t use the EV-150 Kit its too small since I need a type two pump. So, where I need to start is at the EV-200 Kit. One of the thing I have read indicates that the most common failure is under sizing the autopilot components. Additionally, I’m going to find the components pieces by individual piece. Starting with the components in the EV-300 kit. Secondly, I don’t need the Rotary Rudder Reference or the p70Rs Autopilot Control Head. I have the Rotary Rudder Reference, and I have Two RayMarine I70 – Optional (eBay). I can and the p70Rs if I like in the future. This basically saves me anywhere between a thousand and fifteen hundred dollars. What I will need to get is a kit to install my autopilot pump. Lastly, I’ll be doing the installation myself, so I’m able to save some labor?
No Kit, Parts For the RayMarine Autopilot Install
- ACU -300 – RayMarine
- EV1 – RayMarine
- Octopus AF1212 type 2 adjustable piston pump (eBay)
- Raymarine R70160 Evolution Ev-1 Cabling Kit (eBay)
- SeaStar Solutions HF6010 Orb Kit
I was able to find most of this stuff on Amazon, and eBay. There is a ton of information from RayMarine on their website and videos. I strongly suggest you do some of this research on your own for your type of vessel. If you have a Silverton 353MY with similar equipment. Well you are in luck
Octopus Auto Pilot Hydraulic Pump Connection RayMarine Autopilot Install
We are going to start with the how the Auto Pilot pump gets integrated into the vessels systems. This is a little bit of an unknown for me. Below is an expert from the installation manual for the SeaStar Auto Pilot, which is semi applicable.
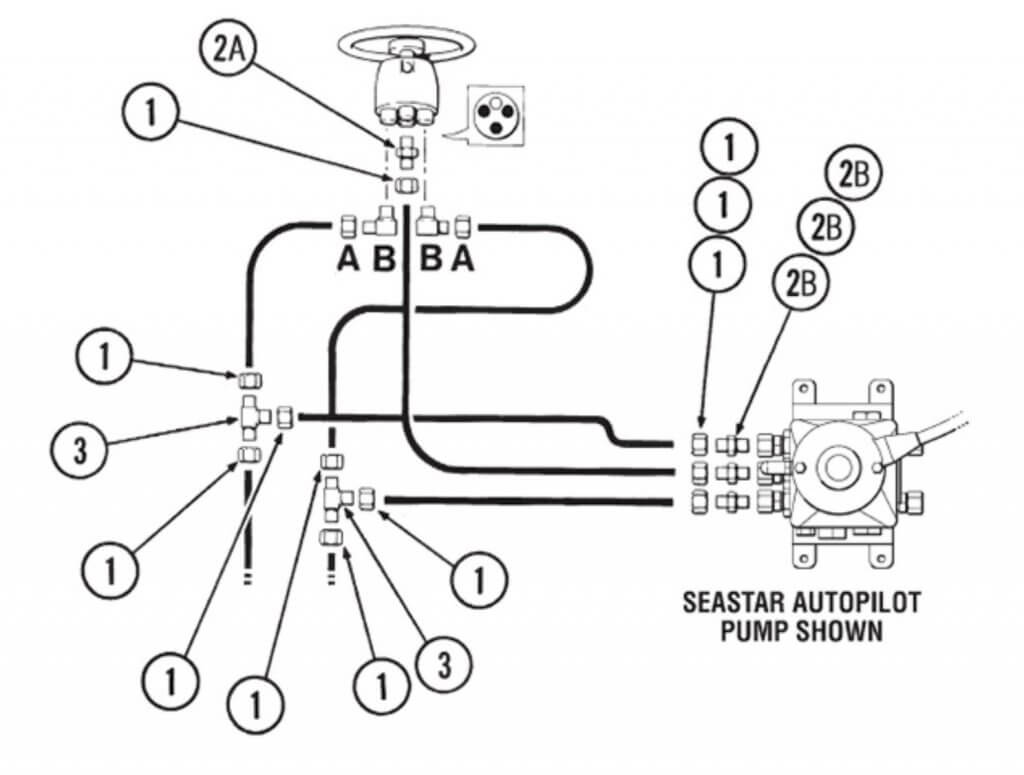
What is needed that I don’t have in place today is the return line to the helm. I need the SeaStar Solutions HF6010 Orb Kit and a length of clear or white nylon tubing. Also I will need to get the Rudder Transducer mounted. The ACU-300 requires the Rudder Transducer. I think these are going to be the two most complex parts of the install. All of this will be installed in the bilge.
Wrapping things up in this Installment!
So to wrap this up, I have everything on order, and I’ll start with the installation in the next two weeks. We are going to do the installation of the of the Rotary Rudder Reference Transducer – RayMarine and the Autopilot Pump. Stay tuned and Subscribe to see what we do next.