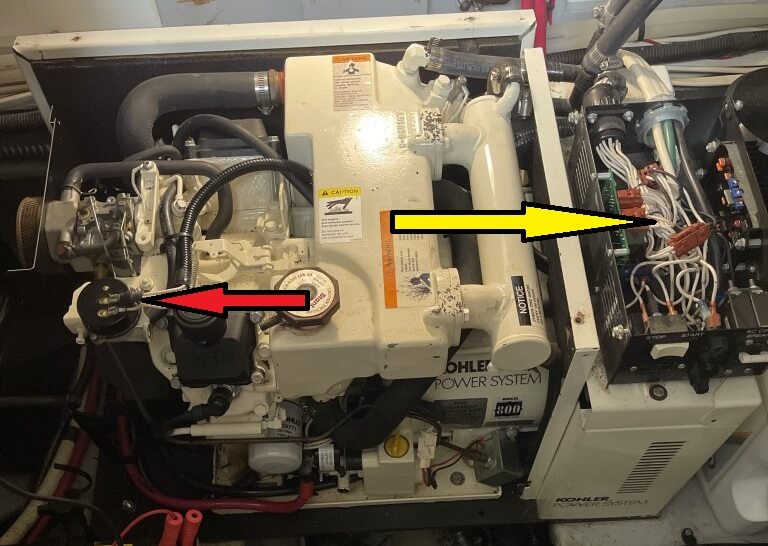
So on the fourth of July night, we went to start the Kohler 7.3E Generator. It started, then started to surge, and then died. This was very similar to what we experienced the 1st time we ran on the generator, it just didn’t die. I pulled up the floor between the Galley and the Seating area. I removed the generator front sound shield and top cover. It held on with four 8mm bolts in each corner. So, this is what the generator looks like with the sound shield off.
The Choke – Kohler 7.3E Generator
To start, the red arrow is pointing to the Kohler 7.3E Generator electric choke. There is a common problem with the Kohler 7.3E Generator and a burnt choke. They also don’t make the choke anymore. Now in the picture above is the new choke. Unfortunately, I did not get a picture of the old one. What makes replacement difficult, is there is a six hundred plus new choke kit. This seems a bit ridiculous. I found the new choke online. I also searched around and compared pictures to see if this choke could work. It was eighty dollars and non-returnable if opened. So be careful if you proceed as I did. I had a few issues, that utterly frustrated me!
The Electric Choke Replacment
Kohler 7.3E Generator Choke Off 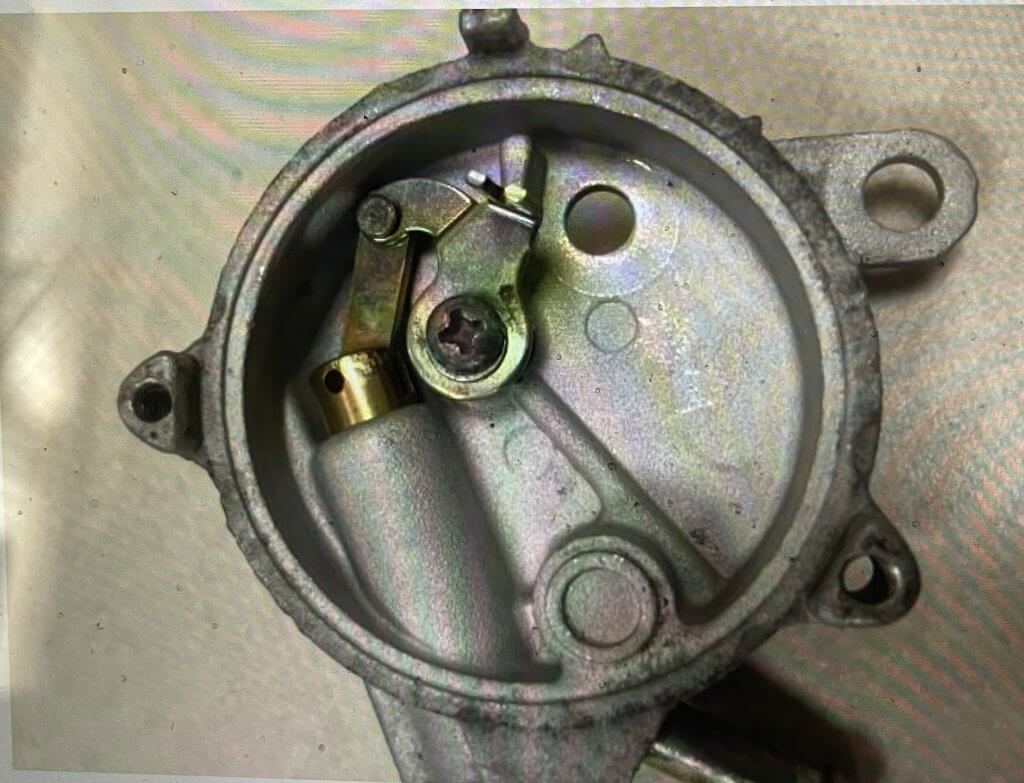
Kohler 7.3E Generator Choke Housing 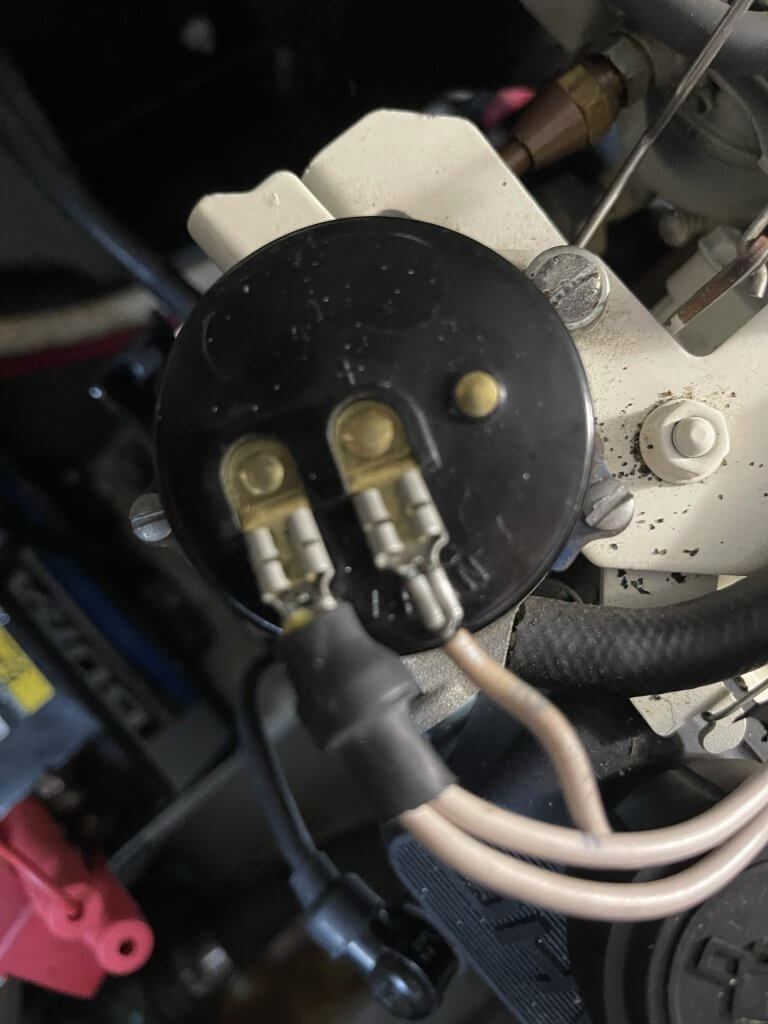
Generator New Choke Housing
So to start you will need to remove the two wires that go to the choke. Now, this is where it gets tricky. The old electric choke has no positive or negative labels. The new one does, and that is where the situation gets messy. The center picture is what is underneath the plate. So the new choke kit looks exactly like the old one with respect to the orientation. The Right one is what it looks like after replacement. Be aware of the wire orientation!
The Electric Choke Orientation – Kohler 7.3E Generator
So the fun started when I put the new choke on. I hit the button to start the generator and it would crank but did not start. so I fussed with the choke orientation (Lean vs Rich). In the top picture, the orientation is lean and honestly, I did not look at how the old choke was oriented. Additionally, I was in too much of a hurry. it’s apparently configured currently with no choke whatsoever. That was not the case when I initially started. It was fully choked, but would not start. so I moved it clockwise to where the old choke was set. I went to start the generator and there was nothing. Not even a click!
Now The Generator Now Wont Start!
First, I looked at the manual under “it won’t start”. I swear I checked the main fuse out of the circuit. There are three of these fuses, the top one is the main controller fuse. So I check for power on both sides of the fuse, but apparently, there is a positive voltage on both sides of the fuse. Not what I’m used to seeing! This is where I got crossed up. So in the top picture in the blog, you will see a yellow arrow. I had to take off the controller cover to see some LED lights. To add to the confusion, the fuses are not glass, they look like a slow blow fuse (white). So it’s not obvious what’s going on without a multimeter. Below is a link to the service manual for this generator.
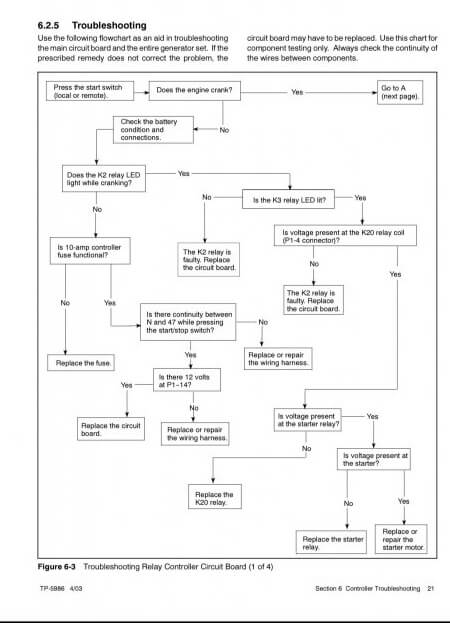
So we start with the troubleshooting process. The Generator does not start so we need to look at the K2 LED that should light when the start switch is pressed which it does not. So I replace the 10 amp fuse and hit the start button and it starts but does not shut off now. I can pull the fuse but that is a short-term solution. What happens next is the fuse blows. So we are back to square one.
One step forward two steps back ?
So after replacing the fuse within a few minutes I notice something smoking on the control board. I quickly pull the wiring to the choke. Next, I switch the positive and negative leads on the electric choke around. Lastly, I replace the ten amp fuse. I hit the start button and it starts. It still won’t shut off but it starts and does not stop. So that’s a positive outcome. Now I just have to fix it because it won’t shut down without pulling the fuse.
The shutdown fix?
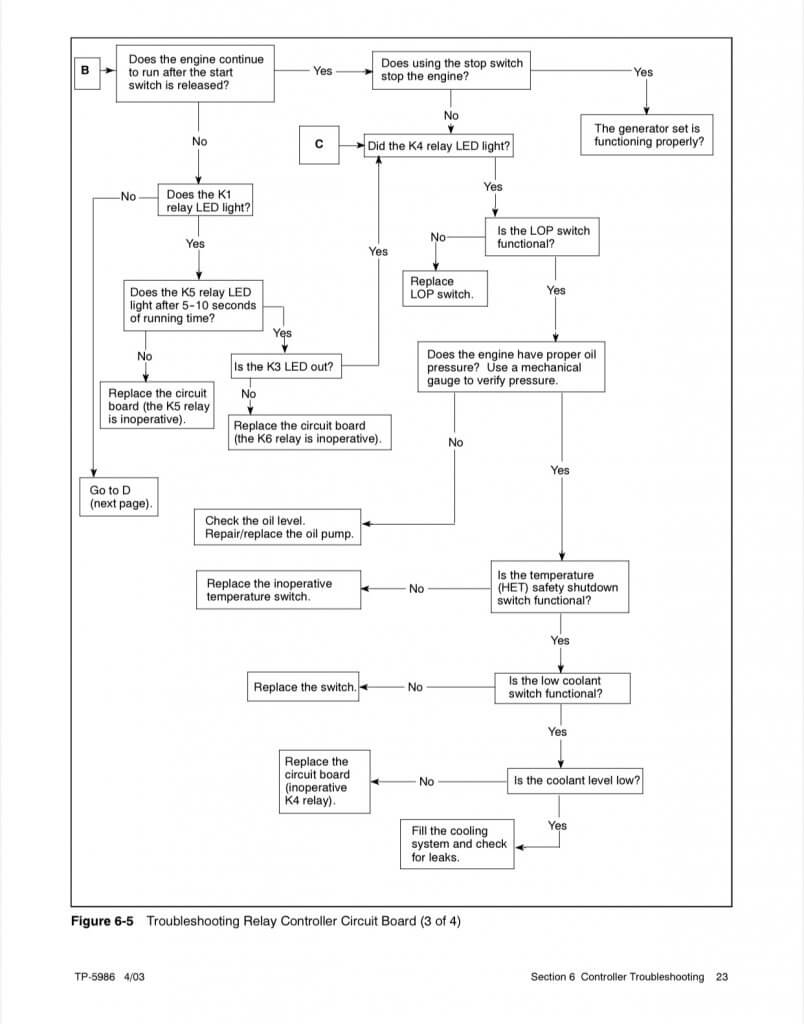
I go through the troubleshooting process of why the generator won’t shut down. I start with the process, and K4 does light when the stop switch is depressed but it does not stop. There is also some reference to the K3 LED in another situation. In another set of steps unrelated to stopping and the K5 LED. It seems to indicate the generator needs to run for 5-10 seconds before the low-pressure oil switch lockout is no longer valid and there is a bad low oil pressure switch (LOP). Next, rather than attempt to start doing anything drastic. I let the generator run for 10 to 15 seconds, and then just hold the stop switch down. About five seconds later it stops. I have a feeling it’s related to a stuck relay or stuck-off switch. Apparently, now it starts and stops just fine and I’m going to just deal with the fact that I may never know exactly how I fixed the no stop condition.
The generator choke needs fine tuning
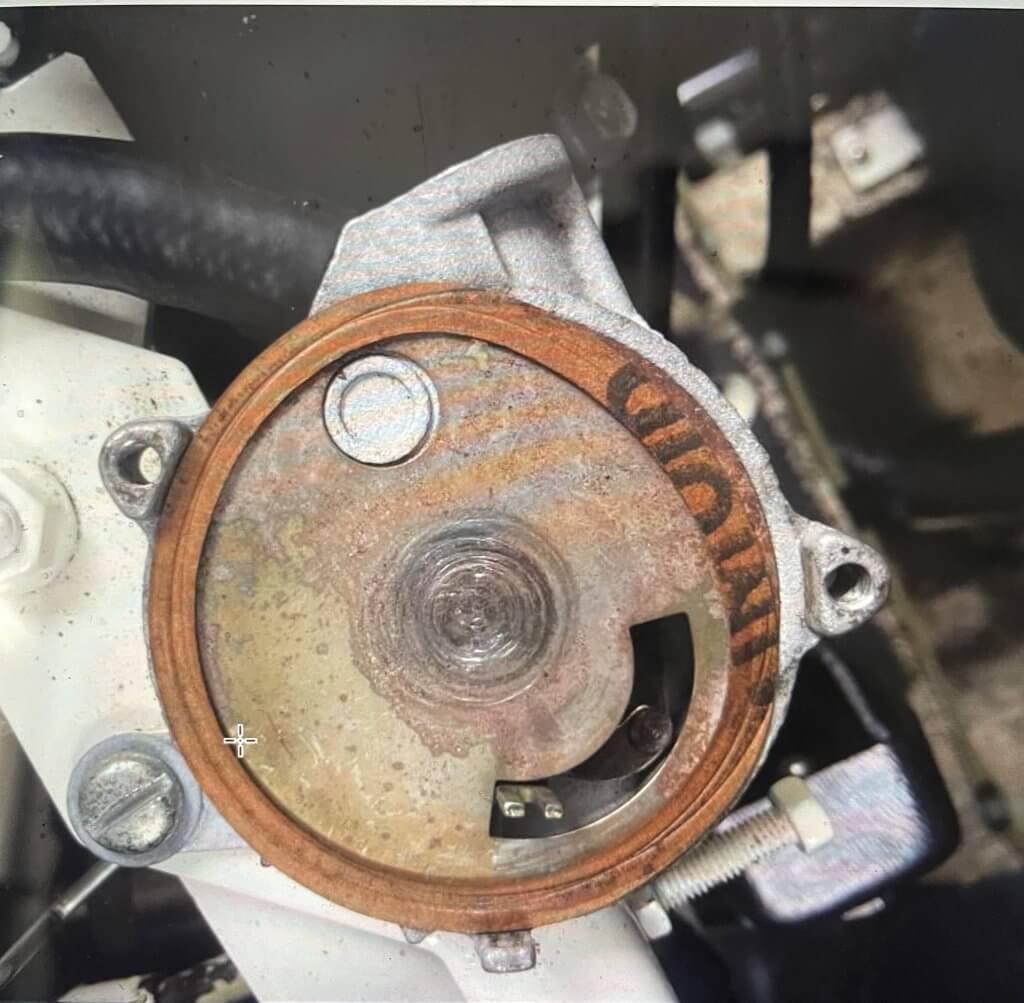
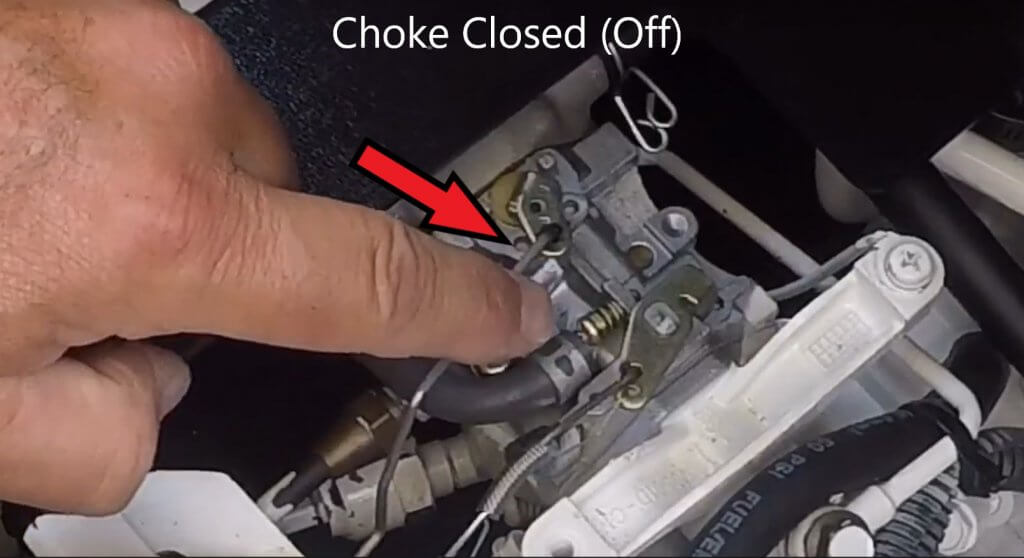
First, the generator is working, but it needs some fine-tuning of the choke mechanism. What is going on is now the generator seems to load and unload without a load on it. I think it going between lean and rich. I have oriented the choke as it was and that may be the issue. I’ll try and turn it counterclockwise to enrich the fuel vs leaned out. I saw a video about how the choke should operate. I’ve pulled out a few pictures that may illustrate how the choke should be oriented. Below is how the choke should be oriented when off. There should be some tension here pulling the choke closed. The way the choke works is when off the bi-metal spring that is under the cover is contracted. When the generator starts it heats the bi-metal spring and causes it to expand, or open the choke.
Adjusting the Choke
So they say a picture is worth a thousand words. Let’s try that! Below to the left is a close-up of the old-style choke and what needs to be adjusted. I don’t have that style choke anymore that is the one to the right but the adjustment is the same process. You want the choke arm to have enough tension to pull the choke closed in the off potion. So to start, loosen the two screws and rotate the choke housing counterclockwise until there is just enough tension to pull the choke closed. See the middle picture.


My choke wires look very different in comparison to the original on the left. I have no earthly clue as to why they are so different. If you replace the choke, I would make sure you orient them correctly. I had issues because they were reversed. You will also notice there is a positive and negative connector on the new choke.
Hi… Thanks.. that’s very good information…
We have to same generator in the boat.. and recently replaced a new carburnetor. However, new issue comes up after the replacement. The generator would start, but once it start throttle(starting to incread the power load), it would just die..
Do you have any suggestion?
Thanks in advance.
Thank you for your write-up on the choke. I’m having issues with my Kohler 5E. It was hunting/surging and was driving me nuts when I was on the hook with a number of other boats. I replaced the fuel filter, then the fuel pump, then the anode. After all that, it wouldn’t start. When I was finally able to get my mechanic to look at it, he said it was the carburetor. So I replaced that. The new carb didn’t come with gaskets so I had to make new ones. While I had the flame arrestor off, I tried to start her up and she started! So I put everything back on and it wouldn’t start. I remember the flame arrestor looking a bit clogged so I took it back off and thoroughly cleaned it. However, it won’t start unless I hold the choke open by hand. So I’m working on that issue now and you’re right, Kohler DOESN’T make the choke assembly (GM12236) any more. I purchased the 359356 (top cap with spring) and got it yesterday. I’m hoping the spring will slide down on to the arm with the slit in it! I have a 2003 Rinker, Fiesta Vee 342 and this generator is perfectly positioned way in the stern, port corner of the bilge so I can’t get to it very easily AT ALL!!
We have a shortage of boat mechanics here in Discovery Bay, CA. A good mechanic would make a killing here.
Dan, I also found out that part of the problem with theses generators has to do with the way the shut down. They just kill the spark and not the fuel. So raw fuel gets dumped into to cylinder at shutdown. The surging and stalling under load could be fouled out plugs. The generator has always been touchy. The lack of good marine mechanics is a problem, that is likely only to get worse. Good luck and reach out to me if you need further assistance- ravi@theprojectboat.com. I’ve been busy with the project house.