This is the third installment in a multi step process of completing a RayMarine Axiom Pi Integration into the “Nauti Oar’s” sub systems. We are about half of the way through the setup. So, up to this point. What we have so far is an operational rear camera, two Fox Marine engine gateways providing data to our RayMarine Axiom and a additional NMEA2000 network drop in the Engine Room. We have a extra NMEA 2000 port available for our next part in our series.
Why We Are Where We Are At ?
Furthermore, in the last part of this series. Things have entirely morphed into a multitude of other sub projects that are all inter related. So, It all really started when I began to run ethernet and power for the rear view camera. The addition of the Fox Marine gateways just pushed it off the edge. More importantly, now what I have are some modern systems in place. Now there an upgrade path for all the legacy boat systems. These are part of the bigger picture. That data I want to populate on my multifunction display. I also want to log historical data so I can trend things like engine temperature.
- Raspberry PI Running – SignalK server, CANHAT (Influx dB & Grafana)
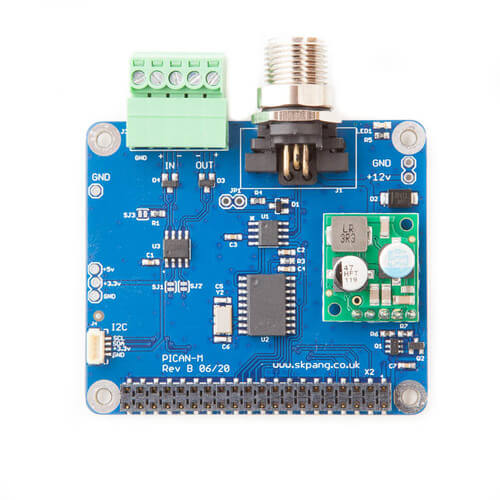
- A PICAN-M – NMEA 0183 & NMEA 2000 HAT For Raspberry Pi
First, to reiterate from the previous blog post, this all went off the rails when I decided I wanted to get some relevant data on the Axiom (RPM, engine oil pressure, oil and water temperature). Secondly, once this information was there there and I started to poking around in the Axiom is what lead to this situation. Thirdly, the Fox engine gateways just made the integration of the information from those systems even more important and evident that they are key. Additionally, The foundational activities to modernize the boat will allow me to get near real time sensor data for digital and analog provided sources. Lastly, I’m expand upon the existing building blocks to get the extended functionality.
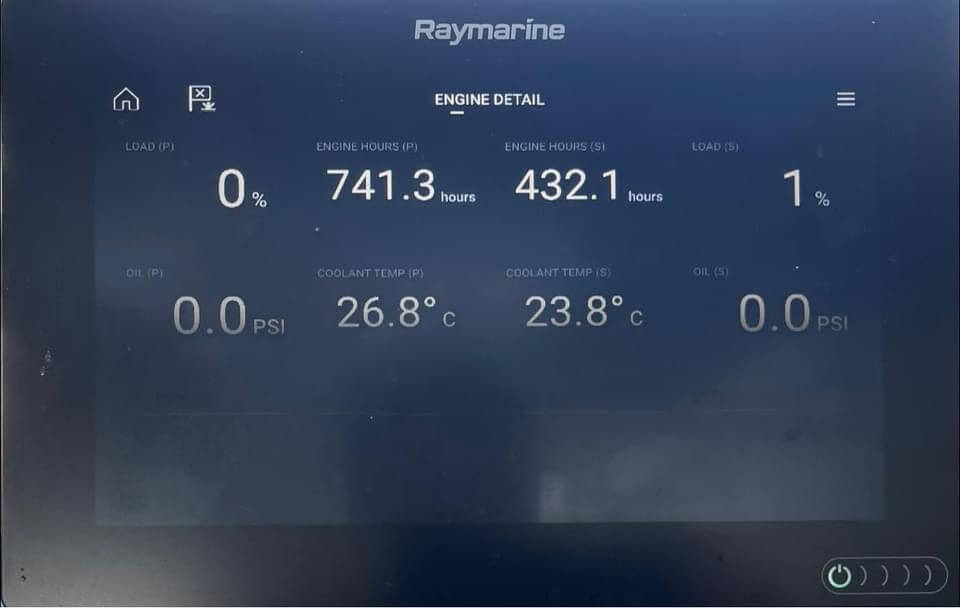
RayMarine Axiom Pi Integration – Tank Data (Missing data set)
So, what I have pictured above is the data coming from the Fox Marine MEFI-3 NMEA-2000 Gateways and the camera. We have them interfaced into the the RayMarine Axiom 9 RV. Now as I looked through some of the available screens, I notice tank levels. Keep in mind, this is all part of the bigger picture of our RayMarine Axiom Pi Integration. Additionally, they are all zero, because there is no available data. They are all analog systems with a gauges at the helm or the salon. So to add to all this, the fuel gauge works sometimes, and is not operational unless you are pressing a switch for the respective tank. So here are a few things I need to look at getting data feeds for the tank screens.
- Port Fuel Tank (First Sensor’s to build)
- Starboard Fuel Tank (First Sensor’s to build)
- Port Water Tank
- Starboard Water Tank
- Black Water Tank
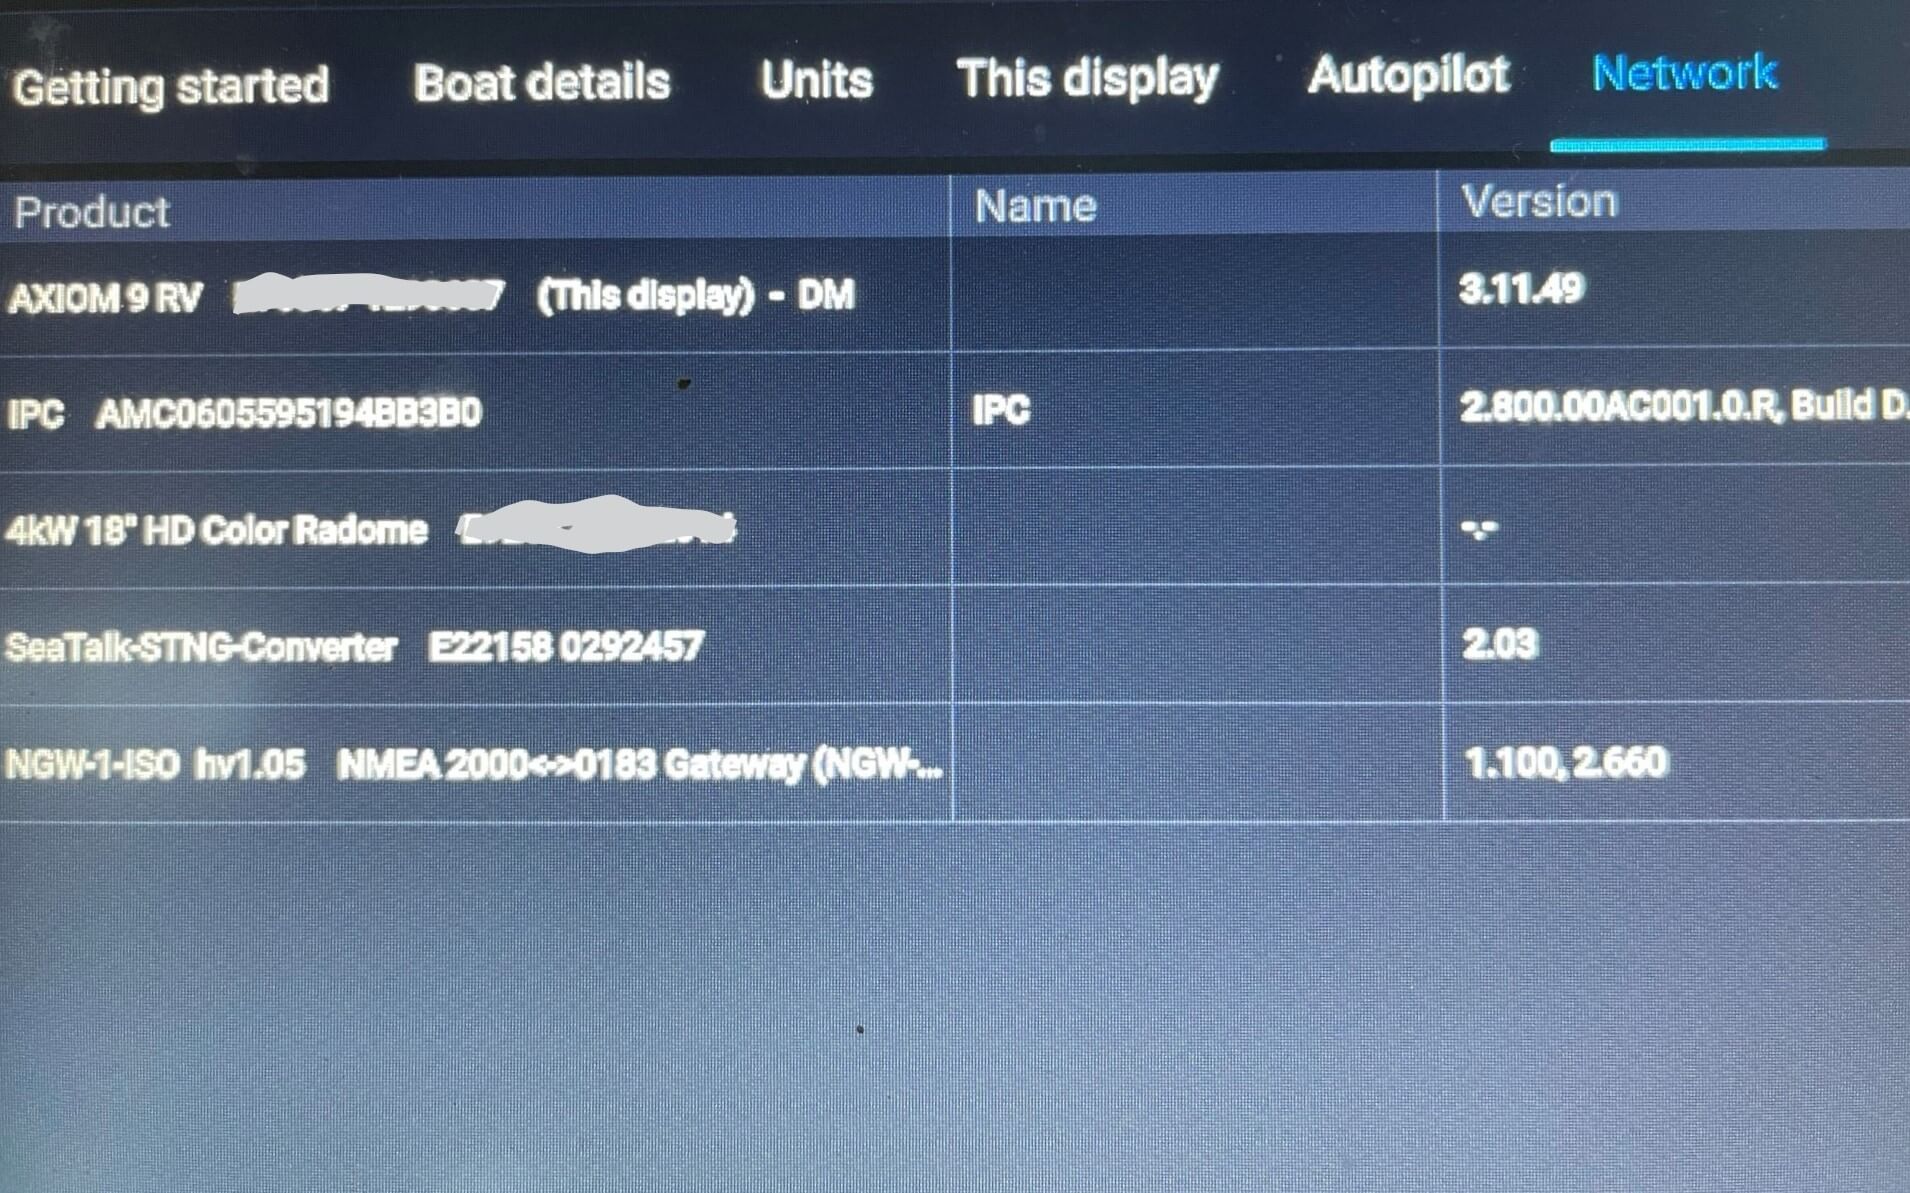
SignalK – RayMarine Axiom PI Integration
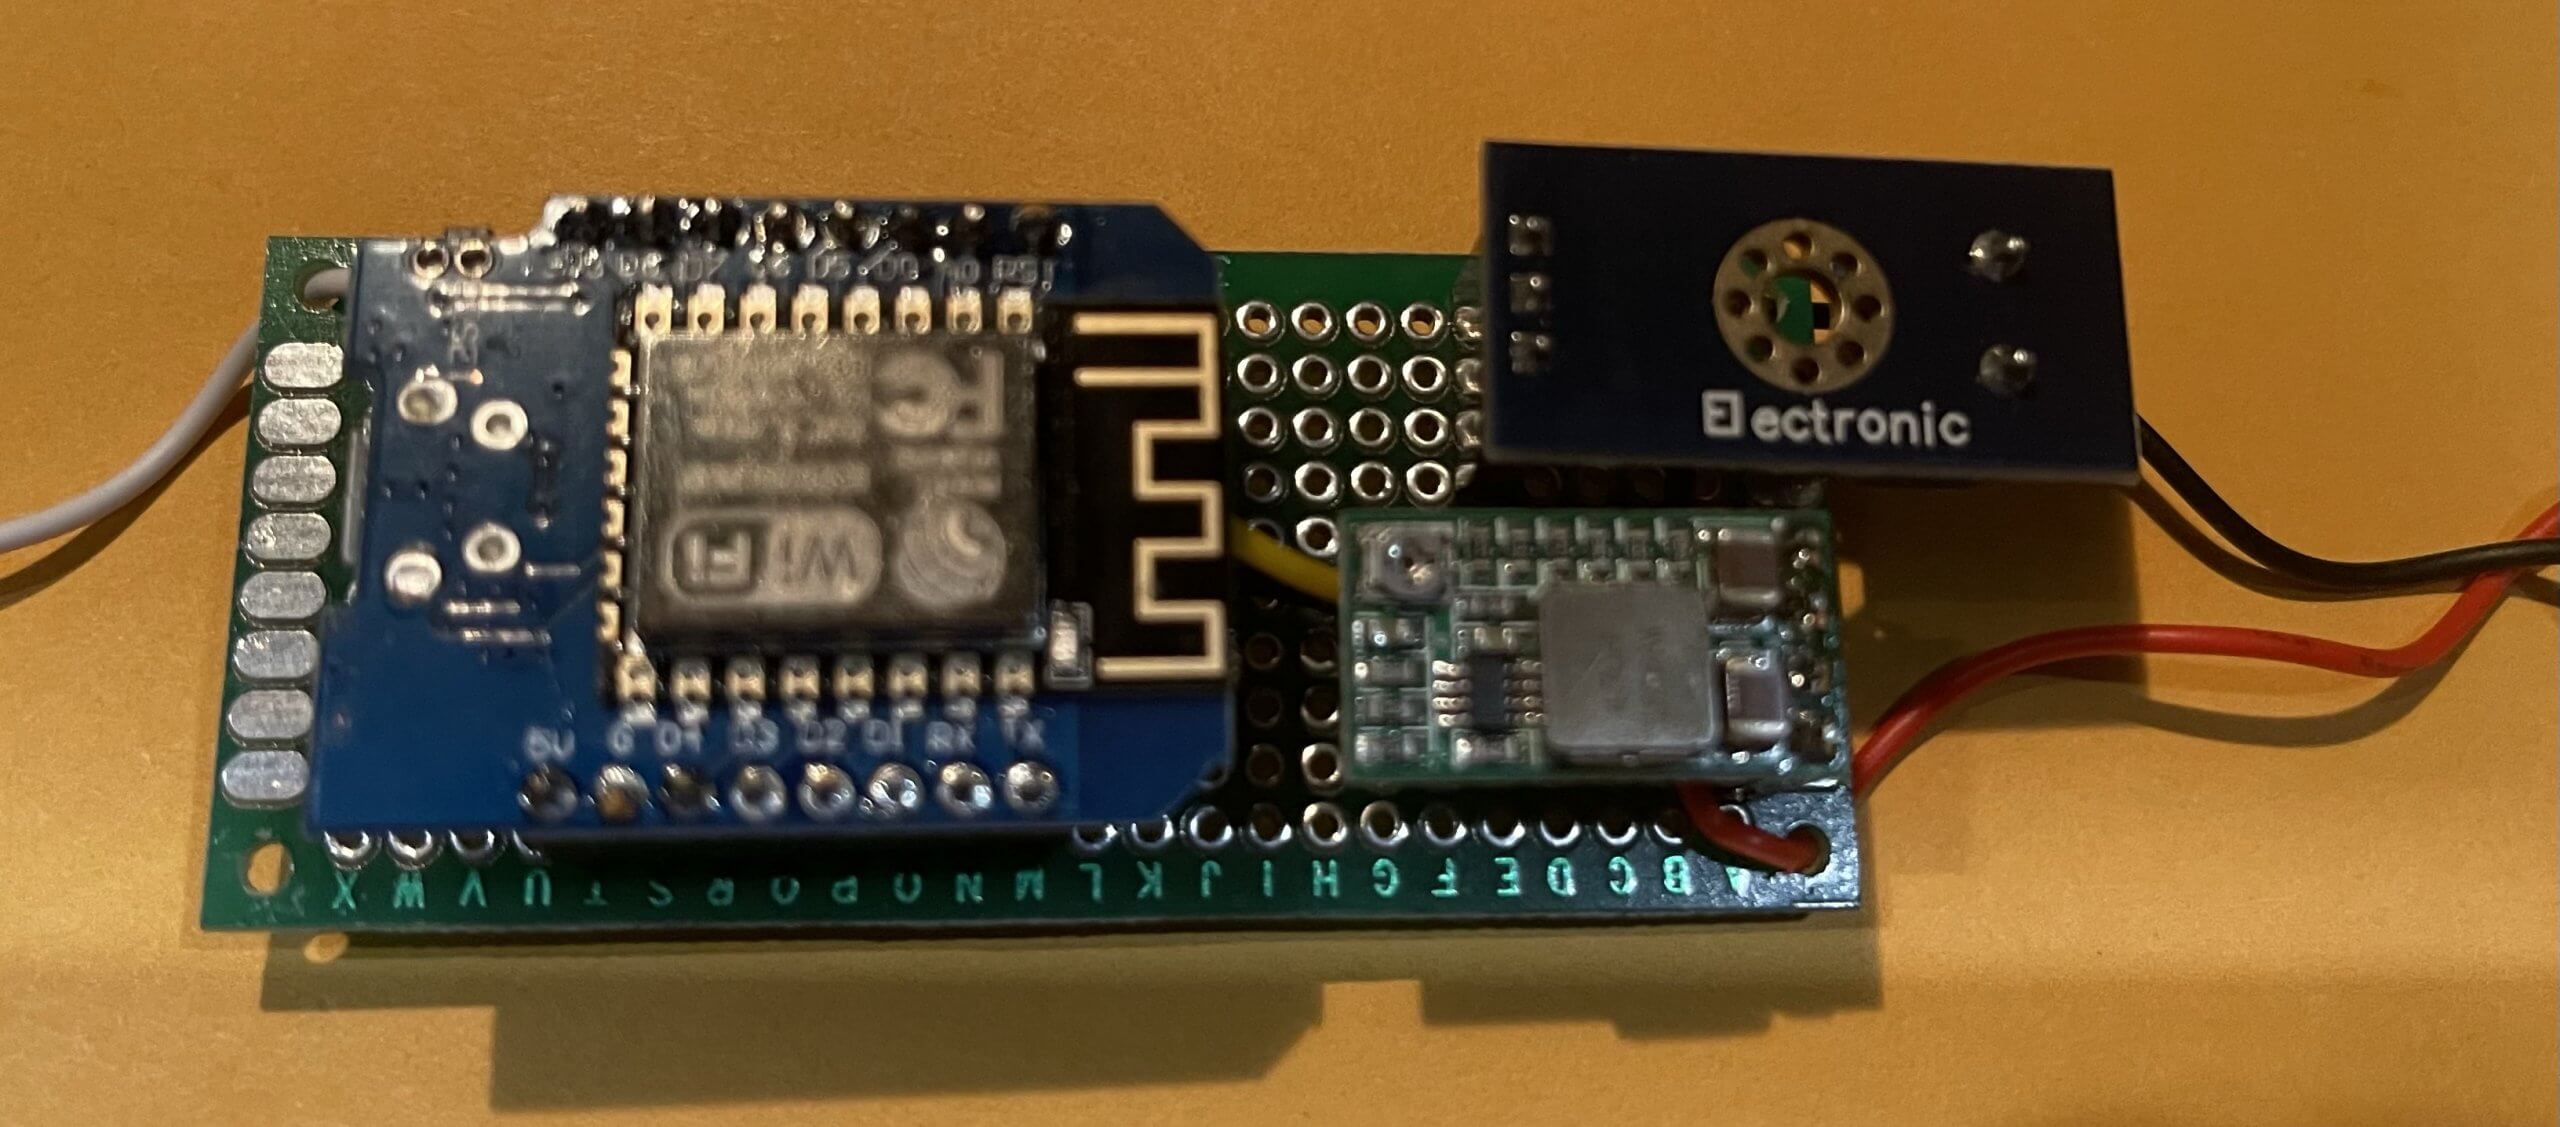
So I did a bit of searching the Interweb, and stumbled upon the “SignalK” and “SeaBits” Websites. There is a ton of information there from these two individuals. So this is not my idea, just the implementation on what they have created. What I’m going to do is use a SignalK server Running on a Raspberry Pi and these inexpensive ESP8266 WiFi devices to send data to the ships systems. That’s the simplistic overview. First, to get the data from the sensors to the ship systems, I will need a few parts.
Secondly, this will all start with a SignalK server running on a Rasberry Pi4 and a PICAN-M – NMEA 0183 & NMEA 2000 HAT For Raspberry Pi. This adapter is from a company called CoperHill Technologies. I have provided a link below. I picked this one because it will power the Raspberry Pi off of the NMEA bus. Additionally, I’ll go though the process of installing these systems so I can start feeding sensor data form the ESP8266’s to the Axiom. Lastly, all the data will be NMEA 2000 PGN’s.
Parts for a SignaK Server Running On A Raspberry Pi 4
So be aware that this is going to be a rather complex and involved process. This will require assembling a Rasberry Pi 4 and PICAN-M Hat. Installing Raspian Software on a Raspberry Pi 4. In the next installment we will be installing CAN Utils, Signal K, Influx DB and Grafana. After we get the systems up and running, we will jump into building sensors. It will be time consuming and require a good knowledge of Debian Linux if you run into issues. Additionally, what you are going to need to get are the following parts and pieces to start and compete this part of the integration. I’ll put the description and a link to where you can find them:
- Raspberry PI 4 Kit
- HiFiBerry HighPi Raspberry Pi Case – Raspberry Pi4
- Raymarine Adapter Device Net Fe Nmea to St-Ng 1m
- A PICAN-M – NMEA 0183 & NMEA 2000 HAT For Raspberry Pi
First off, what I will say, is I’ve never worked with a Raspberry Pi. Hence, doing this is phases. I have Linux knowledge and experience. There are nuances in Red Hat and Debian. I am by no means an expert, but I can get my way through most of it. The assembly will be the simple part except for the case. So on to the assembly so we can start our RayMarine Axiom Integration.
Assembly & Configuration – RayMarine Axiom PI Integration
So the above parts are necessary if your going to use a Raspberry Pi for these functions. For me, I’m not going to be doing anything that intensive. In the future, I may need to look at an Intel NUC for the Influx and Grafanna functions. But for now, we will start with this platform. Its a few hundred dollars in parts and get us better functionality than a Actisense gateway device. Additionally, it provides us more functionality We also have an Actisense NGW1 ISO. It’s in place to covert the RayMarine ST60 (NMEA 183) data to NMEA 2000. This is an assumption, and I could be totally wrong.
What you will use out of the kit are the heatsinks, the Raspberry Pi, the SD card, power cables, power switch and HDMI cable. You are not goin to use the case, and fan. I may use the fan at a later date. The power cable is just to get this powered up and installing the Operating System
PICAN-M HAT – RayMarine Axiom PI Integration
Assembly of the Raspberry Pi and the PICAN-M is straight forward. First, follow the assembly instructions for the Raspberry Pi and attach the heat sinks as noted in the documentation for the Raspberry Pi. Secondly, attach the four stand off’s for the PICAN-M adapter to the Raspberry Pi. Thirdly, attach the PICAN-M to the expansion connector on the Raspberry Pi. Next, screw the PICAN-M the standoffs.
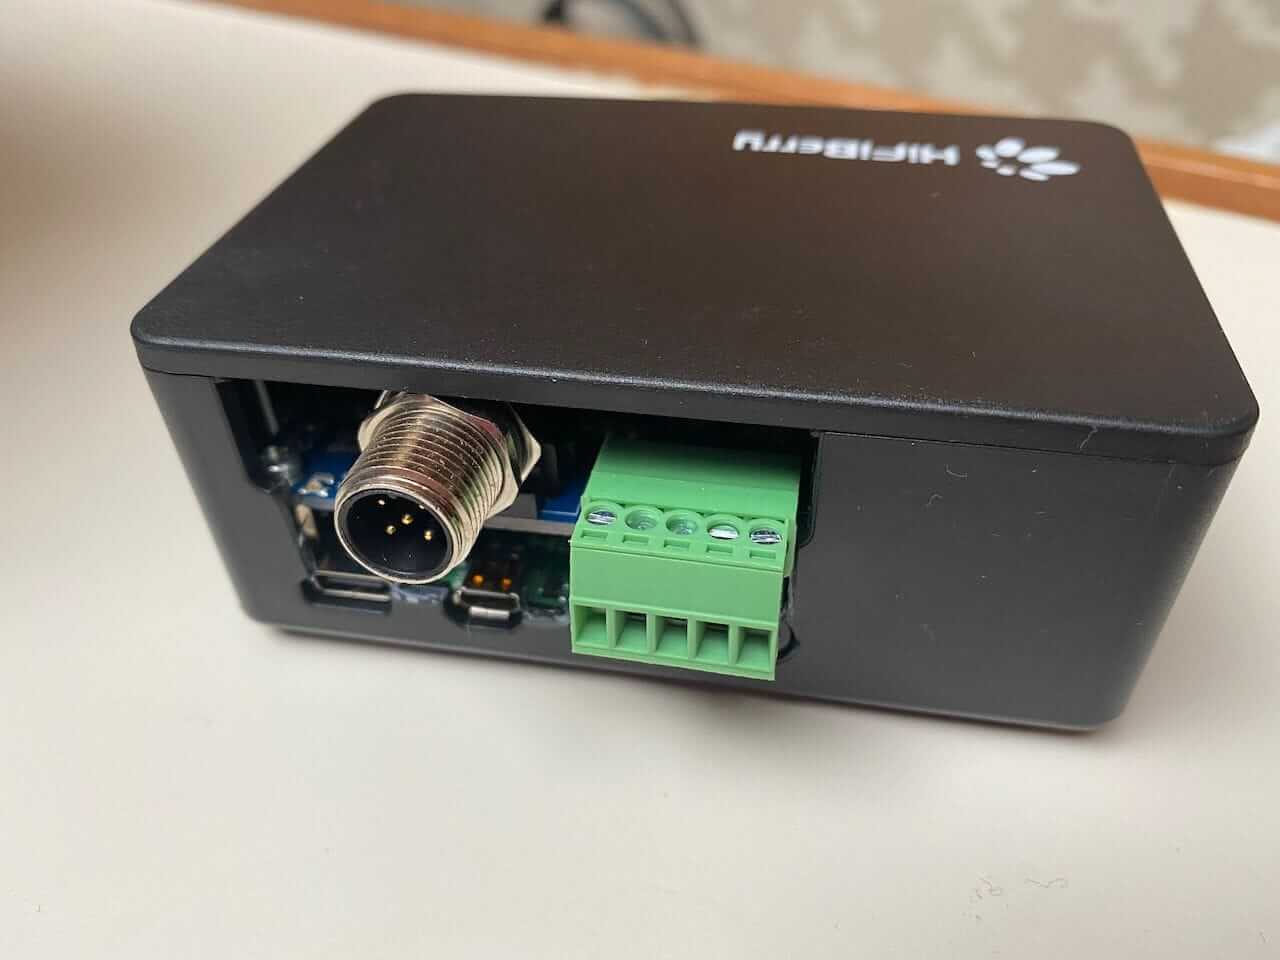
The next part is going to require that you modify the HiBerry case you bought. You will not be using the one supplied in the kit. The green header pin obstructs it from snapping in. I used a Dremel to accomplish this. Once this is done you should snap this all together and be ready for the next step which is to install the Operating system. This completes the PI hardware of our RayMarine Axiom Integration.
OS Installation – Raspberry Pi 4
First, the installation if fairly straight forward. You will need to have some familiarity with Linux. This is the first time I have installed RASPIAN (Debian 10 – Buster). I will point you to the link where as to what to follow. Below is an expert of what I did. This is the process I followed, and not one I created. The source of this is from seabits.com . Steve Mitchell has done an excellent Job of Documenting this. This is his work below, with a few of my additions.
I prefer not to use the provided version of the operating system usually shipped on standard Raspberry PI kits. Instead, I use the Raspberry PI OS Lite image which does not have all of the desktop components. This means it is much smaller, less software installed, and less overhead.
Less software means less updates and downloads to keep things current. That’s a big consideration with limited LTE data plans. Not running all of the desktop stuff means less CPU usage as well.
The software image can be downloaded from the Raspberry Pi OS page and you can write it with an image tool, or you can download an imager that will take care of downloading and installing it all in one.
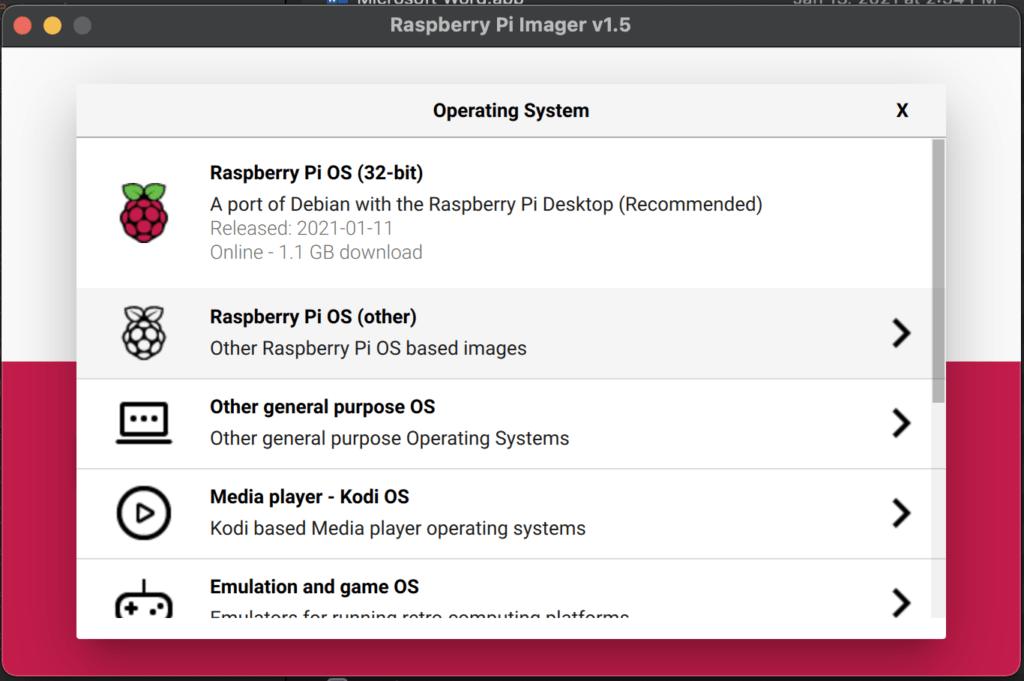
After downloading the imager, instead of using the defaults, choose “Raspberry Pi OS (other)”.
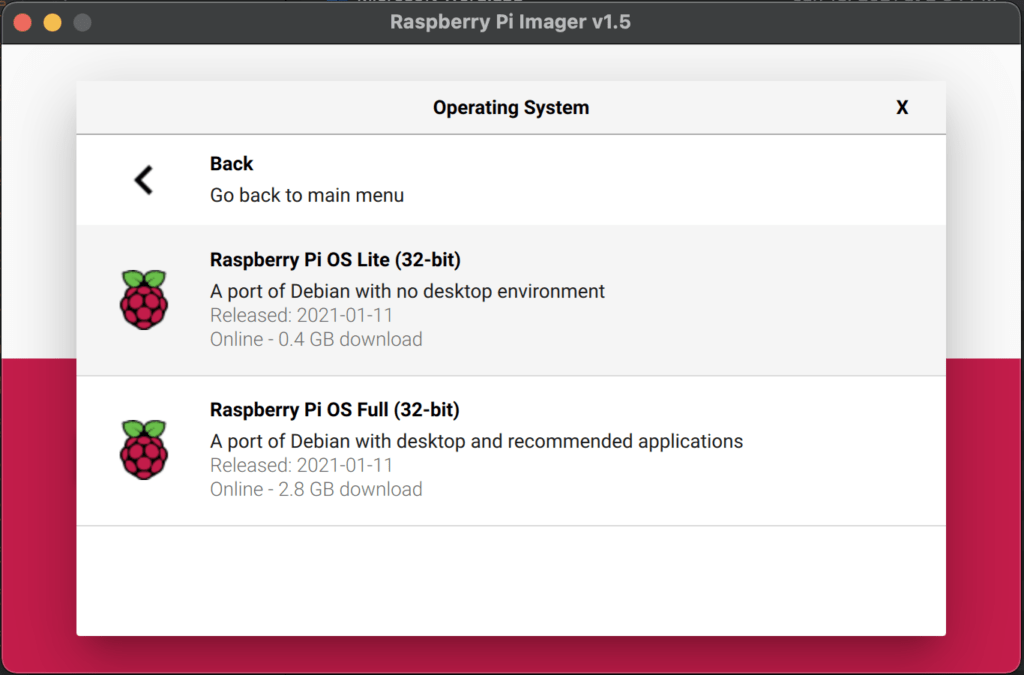
Choose “Raspberry Pi OS Lite” – you’ll notice that it is quite a bit smaller – around 400 MB versus over 1GB for the standard image, or 2.8GB for the full OS.
Once you’ve chosen, pick your SD card, and start the write process. Once it is completed, leave it in the computer as you’ll need to create some files in the next part of the process. The. Networking Setup part below.
Networking – Raspberry Pi 4
I prefer not to have to find a monitor, mouse and keyboard when setting up RPi, and use either the ethernet port or WiFi to get things connected. Ethernet is easy – just plug it in to your switch and apply power. The RPi will pick up an automatic address from your router (DHCP) and you can use that to access it and get started.
If you don’t have a spare ethernet port, or if you set up a lot of these, like me, you can also pre-populate information on your newly created SD card so that the Pi joins your WiFi network on first boot.
You’ll need to create a text file on the SD card in a particular directory with your WiFi network and password. You can read more detailed instructions on how to do this.
WiFi Networking Specific Details – Raspberry Pi 4
Change to the SD card – with the current RPi installer, it seems name the resulting image “boot” – cd /Volumes/boot, then Edit the file for the WiFi info, “vi wpa_supplicant.conf”. You can used either vi or nanao to
accomplish this. Add this text to the file, changing the values to match your country code, WiFi network name, and password.
ctrl_interface=DIR=/var/run/wpa_supplicant GROUP=netdev
update_config=1
country=<Insert 2 letter ISO 3166-1 country code here>
network={
 ssid="<Name of your wireless LAN>"
 psk="<Password for your wireless LAN>"
}
Save the file. This file will be read on startup and will connect to your WiFi network. Note that it can take up to 5 minutes before the install process completes, so be patient.
In addition to the WiFi networking, you’ll need a way to access the Pi remotely, and I prefer SSH. It is secure, low bandwidth, and very reliable. You can read more about how to set this up here, but my short version is below.
You’ll need to create a file in the same directory as the WiFi one above named “ssh”. I use the touch command. Nothing needs to be in the file.
This will enable the SSH server on installation.
Touch sshPut the SD card back into your Pi, provide it power either by USB connection or NMEA 2000 network connection, and sit back and wait for the install to complete. You can connect a monitor if you’d like, but I just wait to see a new IP address appear on my router.
If it does not show up, you’ve done something wrong with the image process or WiFi setup above, and you’ll need to troubleshoot or start over.
Accessing the Pi – Raspberry Pi 4
Now that the Pi is on your network, you’ll need to use SSH to access it. For Mac and Linux, SSH clients are usually built in. For Windows, you can download putty. I’m not going to cover more specifics with Windows – you should investigate this on your own.
The initial connection via SSH is documented in a lot of spots, but here’s my short version for the Mac. I will SSH in the first initial time, accept the new key from the device, and then share my SSH key so I never have to type a password in again. I also change the default “pi” user password to something complex in the event I do need to get in with a keyboard or mouse. High level steps:
Initial SSH connection – Raspberry PI 4
ssh pi@<your Pi's IP address>The default password is “raspberry”. Once I’m in, I change the password using the “passwd” command. I then share my SSH key with the device so I don’t have to use a password again. I highly recommend you use passwordless authentication instead of a username and password – read more about how to set that up here.
Update the OS – Raspberry PI 4
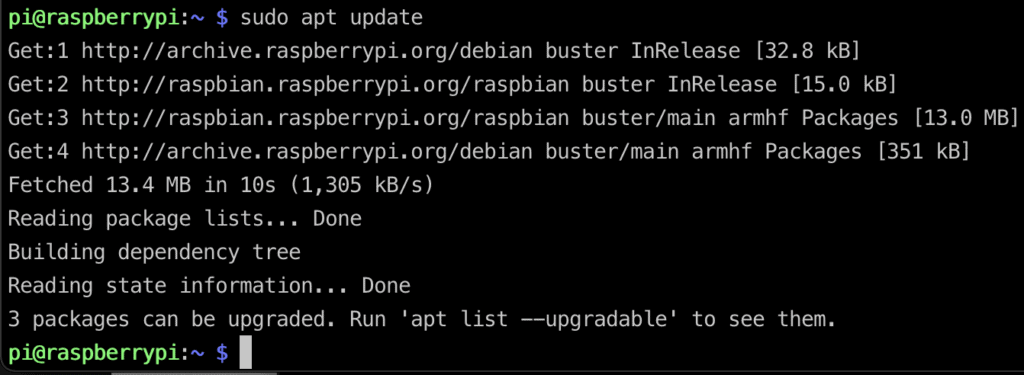
Before I do anything else, I like to update the OS so I know I’m working from the newest of everything in case I run into an issue:
sudo apt updateOnce that completes, you’ll see whether there are updates to be had
Update the package’s
sudo apt upgradeOnce that completes, I reboot to make sure there aren’t any other updates that need to happen in the background, and then it’s time to get into some basic configuration.
Installation Notes – Raspberry Pi 4
With all of the installation steps below, I assume you are using the “pi” user that has already been created and the commands will assume that. If you choose to create your own user, make sure you have the right permissions with sudo.
Basic OS Settings
There are a number of things I like to do to any Pi image to help with identifying it (hostnames), setting the local timezone, setup automatic updates, etc.
Set the hostname.
sudo hostnamectl set-hostname <your host name>Once you’ve set the hostname, you’ll want to add that to the /etc/hosts file to prevent errors from sudo not being able to find it, and other programs barfing as well.
sudo nano /etc/hostsAfter the entry for loopback and raspberrypi, add whatever hostname you chose:
127.0.1.1 raspberrypi boatpiControl-X to save and exit.
Set correct timezone.
sudo dpkg-reconfigure tzdataSet up unattended upgrades. This allows the operating system to update itself automatically and reboot if needed.
sudo apt-get install unattended-upgrades -y
sudo dpkg-reconfigure --priority=low unattended-upgrades
Wrapping things up in this Installment!
There are a number of other things that I usually do such as email setup and gateway, setup apticron for email notifications of software updates, and more, but those are more advanced. You can see some notes about this at the end of the article.
After doing all of this, it is a good idea to reboot to get the hostname to show up, and to let things boot back up with the correct timezone.
What I will say is that I built this in parallel with a Virtual Machine so I can do testing off of the boat with the sensors I’m going to build. I used VMware Workstation. All these steps work there as will. There are some nuances with it. Especially around apt upgrade. I have a bench that I do some electronic repair of Sea Doo Displays. It will be easier to do this on the bench and the couch vs in the bilge of the boat (“Nauti”). Reach out to be if I can help in any way. This will be a multi skill learning exercise (Mechanical, Electronics, and Programming).
upgrade
    upgrade is used to install the newest versions of all packages
    currently installed on the system from the sources enumerated in
    /etc/apt/sources.list. Packages currently installed with new
    versions available are retrieved and upgraded; under no
    circumstances are currently installed packages removed, or packages
    not already installed retrieved and installed. New versions of
    currently installed packages that cannot be upgraded without
    changing the install status of another package will be left at
    their current version. An update must be performed first so that
    apt-get knows that new versions of packages are available.
dist-upgrade
    dist-upgrade in addition to performing the function of upgrade,
    also intelligently handles changing dependencies with new versions
    of packages; apt-get has a "smart" conflict resolution system, and
    it will attempt to upgrade the most important packages at the
    expense of less important ones if necessary. So, dist-upgrade
    command may remove some packages. The /etc/apt/sources.list file
    contains a list of locations from which to retrieve desired package
    files. See also apt_preferences(5) for a mechanism for overriding
    the general settings for individual packages.
I had to do an apt dist-upgrade instead of the apt upgrade. You may run into this issue as I did. Up to this point we chance competed the Hardware and Raspberry PI installation to start our RayMarine Axiom Integration.
RayMarine Axiom PI Integration – Part Three Conclusion
So what we have up to this point is a fresh install of Raspain, based upon Debian Buster (10).
- Raspberry PI Running – Installed and Configured
- A Pi CAN HAT Adapter – Installed not configured
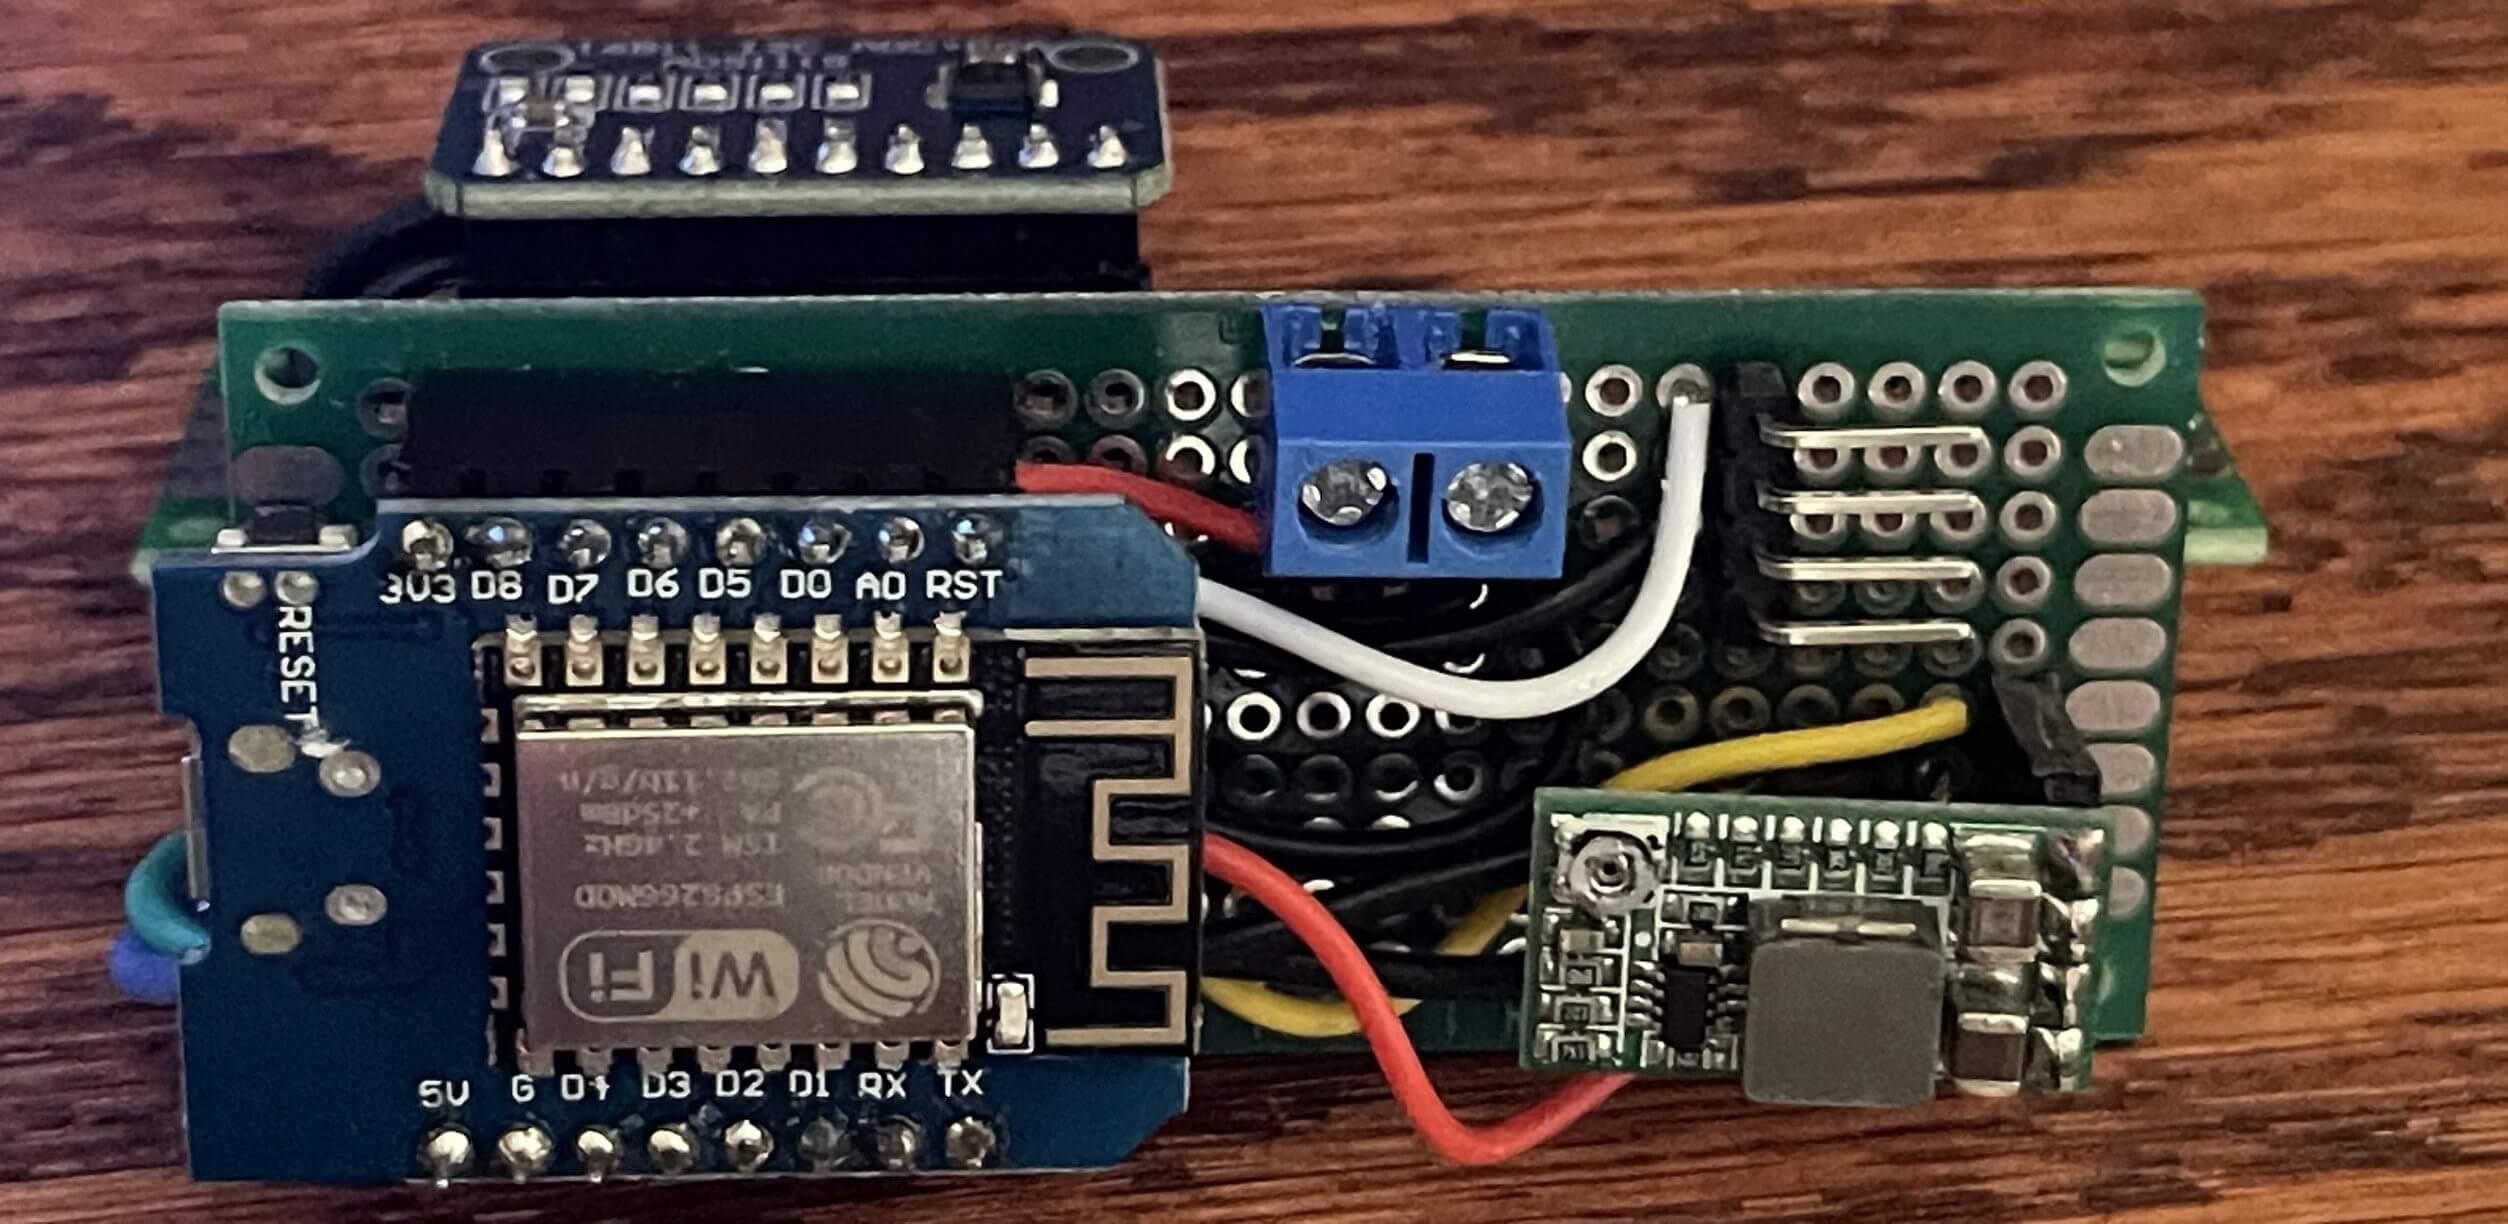
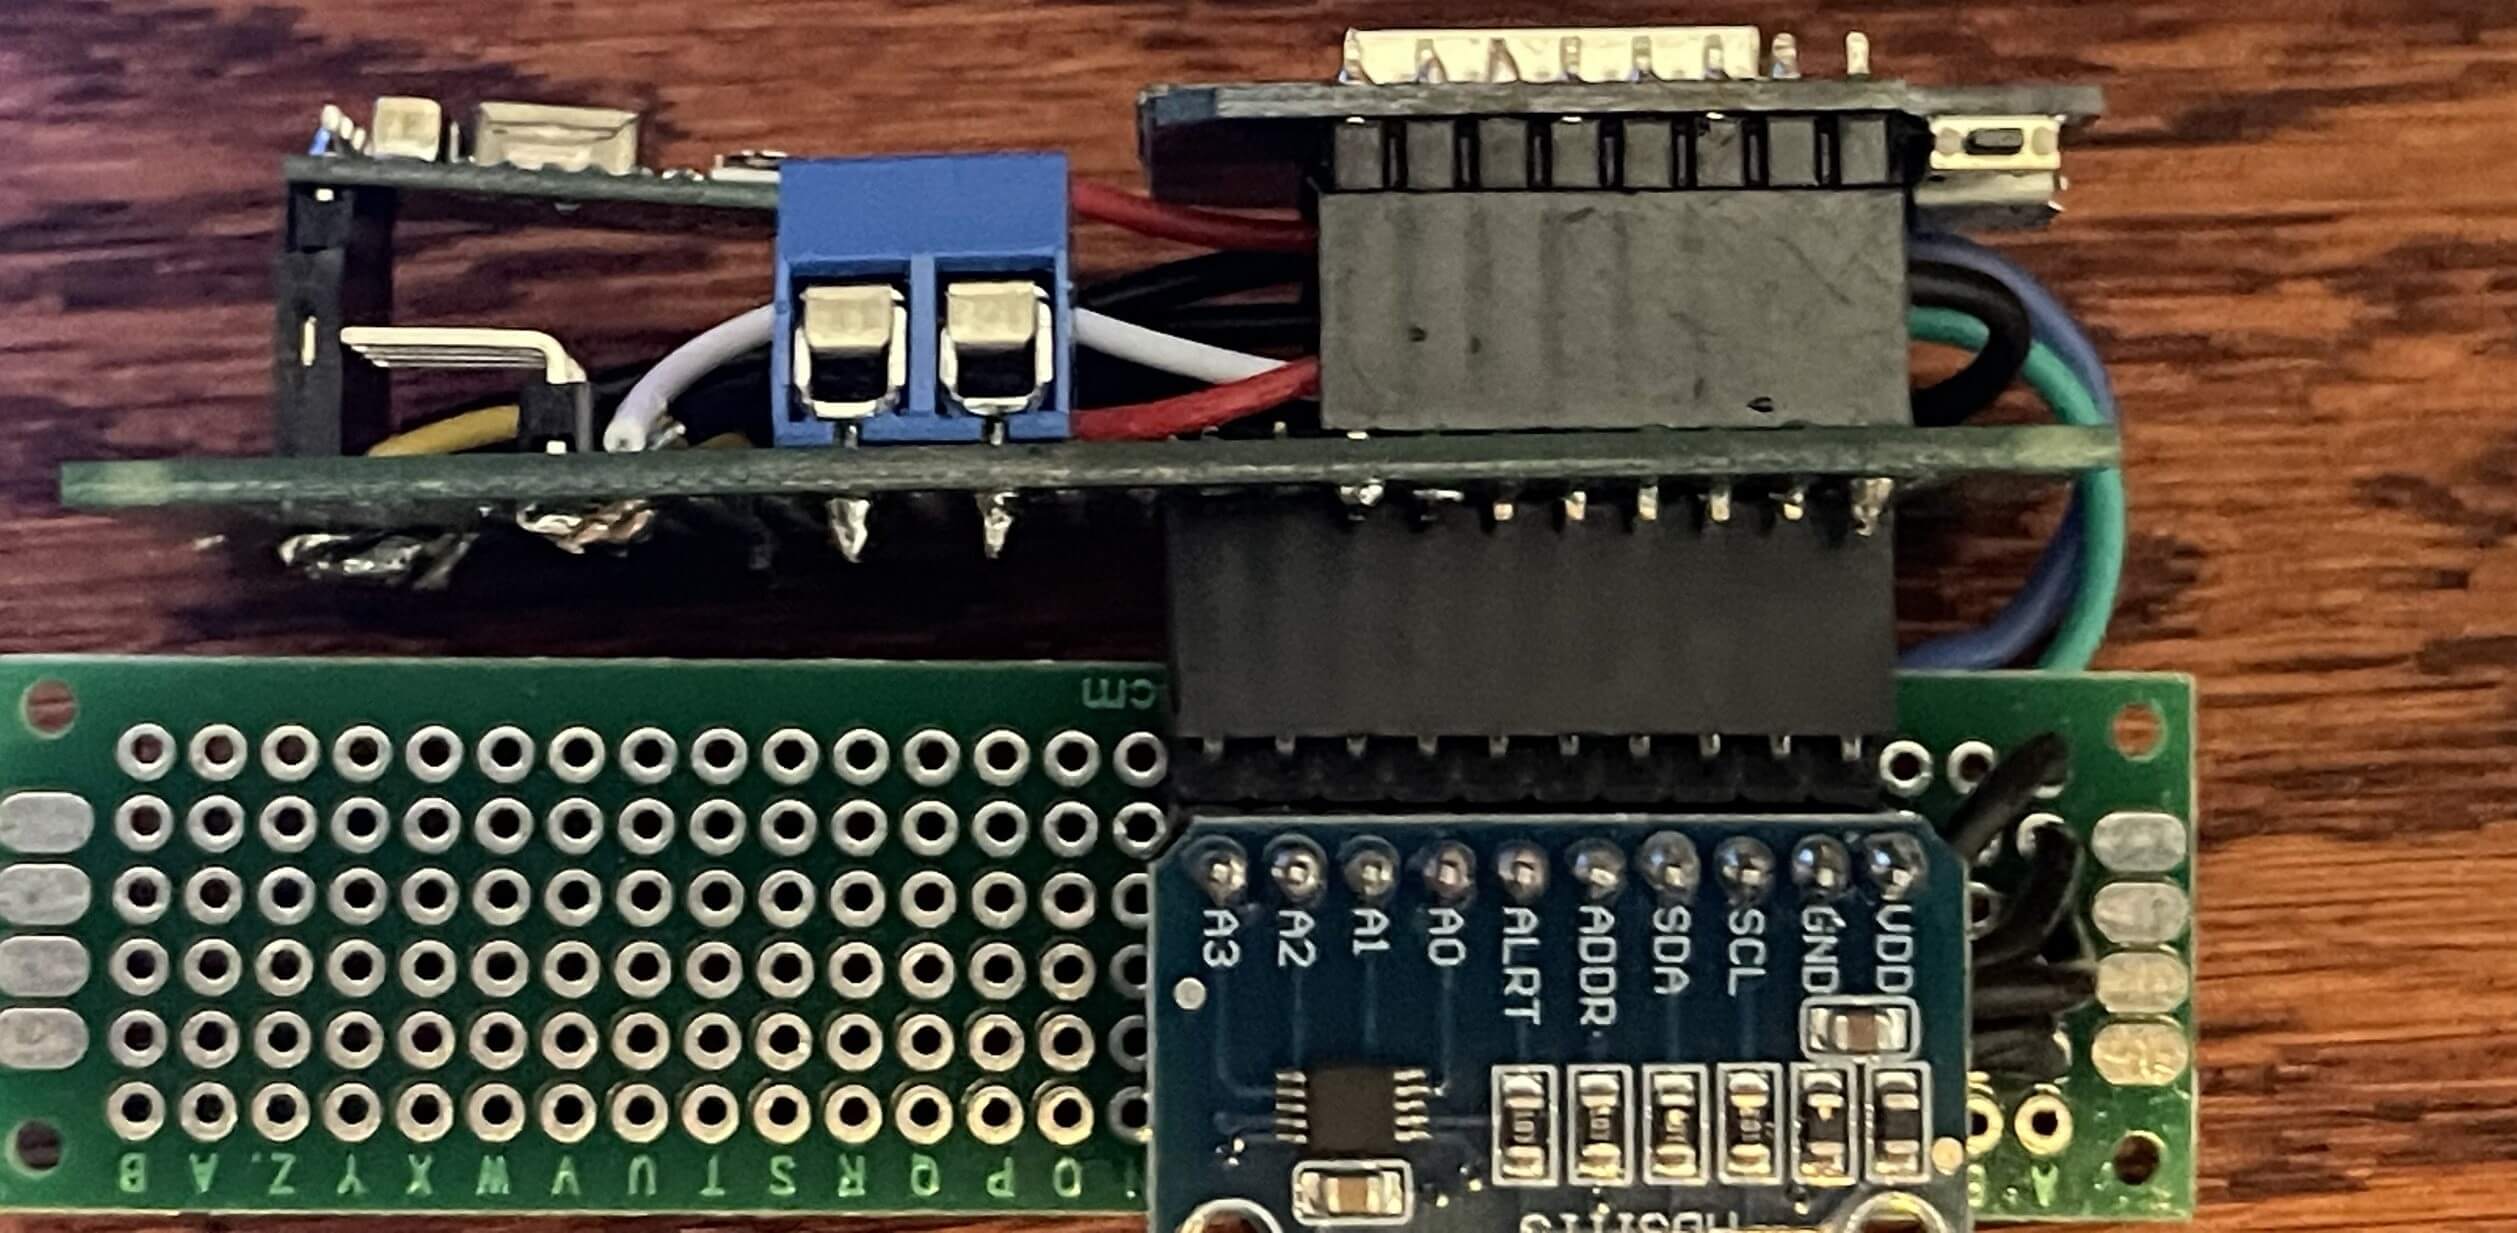
So next in the next Part of this series. We will finish the installation by installing the CAN utilities and SignalK. I’m doing this in phases , so that I can get to a stopping point and verify that all that I have done is functional. I’m going about things in discrete phases so I can deal with issues that may arise in a phase. This is just how I tackle everything. Above is a preview of a module I have built. This is going to be the Port / Starboard Fuel tank sensor and battery sensor. This is the end state of this series, monitoring systems with these SOC devices.
I recommend protecting the boot sector as it can get corrupted if you shut down the pi during bootup, there’s a setting in raspi-config for this.
Thank you Dave!