So it hard to believe we are at part four in our series. This is the Fourth installment in a multi step process of completing our Axiom SeaTalk Pi SignalK Integration into the “Nauti Oar’s” sub systems. We are more than about half of the way through the setup. At least I think? So, up to this point. What have so far is an operational rear camera, two Fox Marine engine gateways providing data to our RayMarine Axiom. Lastly, we have a base installation of a Raspberry Pi 4 and the Pi-CAN-M hardware.
Really part four!
So, your probably asking yourself are we really up to part four in this series? Short answer is yes. To recap, in the third part of this series. We finished the installation of the Raspberry Pi 4 and the PI-CAN-M Hat. Secondly, we now have a functioning Raspberry Pi 4. What we need to do next if to get the PI-CAN-M configured and Install the SignalK Server. I’m going to stop there and not proceed further until I get a sensor (Port Fuel Tank) that can send data to the SignalK server. I’m trying to eliminate complexity and use a systematic approach. Furthermore, the sensors are going to challenge for me. But as they say , nothing ventured, nothing gained. So, let start on RayMarine , SeaTalk Pi SignalK Integration.
RayMarine Axiom PI Integration (Continued)
So, to recap. In the last installment of the series , we installed all the hardware and the Operating System. Secondly, we are at the point that we have installed the Raspberry Pi and are set to install the software Components the get base system functionality working with the SignalK Server. Most of the content came for Sea
- NMEA 2000 bus tools
- Pi-CAN-M Utilities
- Install and Configure SignalK Server
Installing NMEA 2000 bus tools – SeaTalk Pi SignalK Integration
Let Start. We need to begin by Installing NMEA 2000 bus tools This is the Software that allows the PI-CAN-M Hat to communicate on the NMEA 2000 bus. These are the operating system level tools and libraries that need to be installed in order to access the NMEA 2000 interface. Additionally. this is more generically called CAN-bus.
First, you need to edit the /boot/config.txt file and add these lines to the very bottom of the file, then reboot the system:
enable_uart=1
dtparam=i2c_arm=on
dtparam=spi=on
dtoverlay=mcp2515-can0,oscillator=16000000,interrupt=25
dtoverlay=spi-bcm2835-overlay
These add appropriate devices and configuration for the PICAN-M board. Once you’ve done that, we’ll need to install the canbus tools
sudo apt-get install can-utils -yNext, we need to bring up the CAN-bus/NMEA 2000 interface. This is the manual process. In the next step we will add this to the startup scripts.
sudo /sbin/ip link set can0 up type can bitrate 250000So. to add this to a startup script so that the command is run every time the system reboots. You’ll need to create the following file and copy it into /etc/systemd/system.
nano socketcan-interface.servicePaste the contents of the below into the file. Press Control-X to save and exit.
[Unit]
Description=SocketCAN interface can0 with a baudrate of 250000
[Service]
Type=oneshot
RemainAfterExit=yes
ExecStart=/sbin/ip link set can0 type can bitrate 250000 ; /sbin/ifconfig can0 up
ExecReload=/sbin/ifconfig can0 down ; /sbin/ip link set can0 type can bitrate 250000 ; /sbin/ifconfig can0 up
ExecStop=/sbin/ifconfig can0 down
[Install]
WantedBy=multi-user.target
Copy the file to the appropriate systemd directory and give it the right permissions
sudo cp socketcan-interface.service /etc/systemd/system
sudo chmod 644 /etc/systemd/system/socketcan-interface.service
sudo systemctl enable socketcan-interface.service
Now, to test that things are working correctly, you can use the command candump and see the raw traffic from the NMEA 2000 network.
Warning that this can be a lot of data – to get out of it, press Control-C
candump can0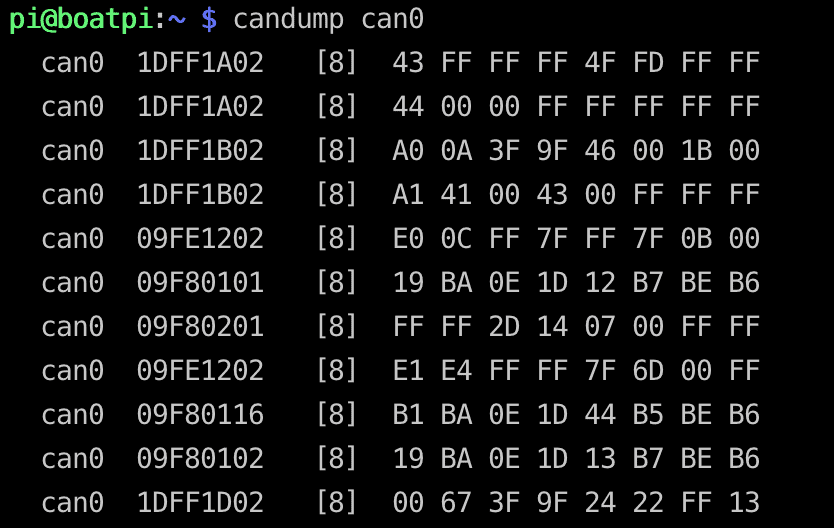
You should see data similar to the above. This confirms that you are getting data from your NMEA 2000 network. If you don’t see anything, then you have a cabling issue, configuration issue, or a bad board.
Signalk Dependency Installation – SeaTalk Pi SignalK Integration
These steps help install Signal K and connect it to your NMEA 2000 network. The official Signal K repository has a step by step guide to do this. I’m going to simplify the steps based on the hardware and goals we have.
Install prerequisites. This is a decent amount of software, so be patient. It includes Node.JS, the engine that Signal K is run off of, and all the supporting packages.
sudo apt install nodejs npm -yInstall latest version of node package manager (NPM).
sudo npm install -g npm@latestSignalk Dependency – Raspberry Pi Virtual Machine NPM Issues
So, I had problems on my Raspberry Pi Virtual Machine, and a clean install of Debian 18.x on a non Pi Device. I had to use this alternate process to get NMP to install. Found this on the slack channel. According to https://github.com/SignalK/signalk-server NPM should be v16, but several one of the plugins then fail to install. here is what I did:
sudo curl -sSL https://deb.nodesource.com/setup_16.x | sudo bash -
sudo apt install nodejs npm
The ‘apt install’ from https://github.com/SignalK/signalk-server/blob/master/raspberry_pi_installation.md fails. So, ‘npm’ cannot be installed this way; it is already part of ‘nodejs’. So I continued with:
sudo apt install nodejs
sudo npm install -g npm@latest
sudo npm install -g npm@8.1.4
Install secondary dependencies
sudo apt install libnss-mdns avahi-utils libavahi-compat-libdnssd-dev -ySignalK Installation – SeaTalk Pi SignalK Integration
So to start the installation of Install the Signal K server
sudo npm install -g --unsafe-perm signalk-server -yNow you have Signal K installed but it is not running yet
Setup SignalK
We’re going to go through the setup script below. To Run the setup process:
sudo signalk-server-setupOnce the setup script starts, you’ll be prompted to choose a number of things. Below are what I recommend – obviously replace your boat name and MMSI.
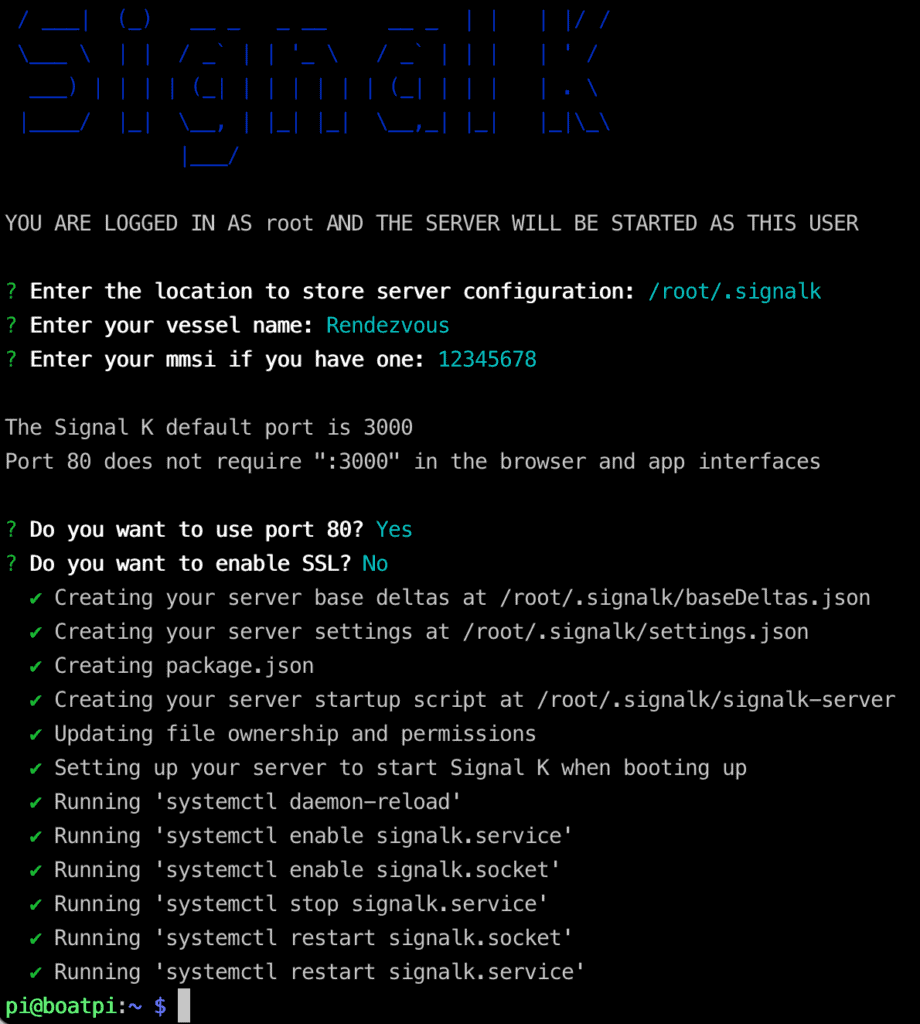
Some may wonder about my choice not to setup SSL – this is your choice, but I have found that serving Signal K over SSL, also known as a secure site or HTTPS, is resource intensive. On a busy NMEA 2000 network, it can add overhead that is not necessary if your network is secure.
We also need to make sure that Signal K starts up after the can0 CAN-bus interface we configured earlier. To do this, we’ll need to edit the startup dependencies:
sudo systemctl edit signalk.serviceIn the resultant editor, you need to add this text:
After=socketcan-interface.serviceUse Control-X to save the file. This will ensure that Signal K starts after the CAN bus interface
Once you’ve done this, Signal K should be installed and initially configured, and set to start up on boot. Let’s get it started up and login to the web interface:
sudo service signalk startHead over to a web browser and connect to the IP address or hostname of your Pi – you should get a Signal K screen:

Login as admin (upper right login button) with a password of “signalk”. You should change this at some point.
Configuring NMEA 2000 Interface
Login to the Signal K web interface as admin. Head over to Settings -> Data Connections. Click on Add and configure it as below.
- Data type: NMEA 2000
- Enabled: YES
- Logging: NO
- ID: 1 (this is just a number I chose)
- NMEA 2000 Source: Canbus (canboatjs)
- Interface: can0
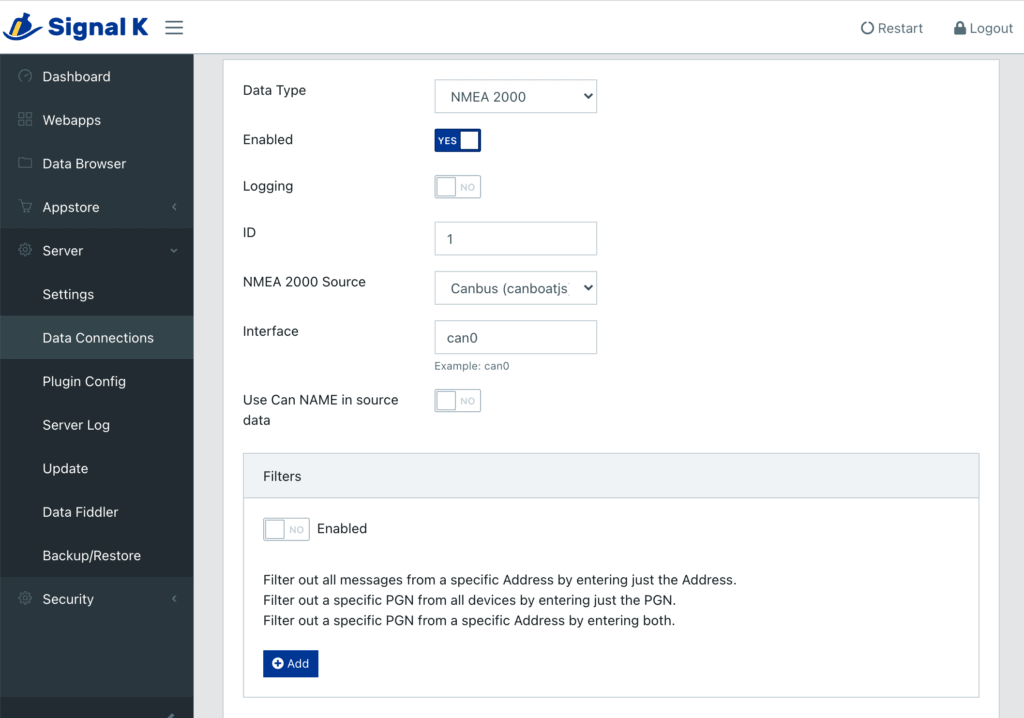
Once you’ve added it, you’ll need to restart the Signal K server (upper right). You have to do this whenever you make a configuration change to the server or plugin, add a plugin, etc.
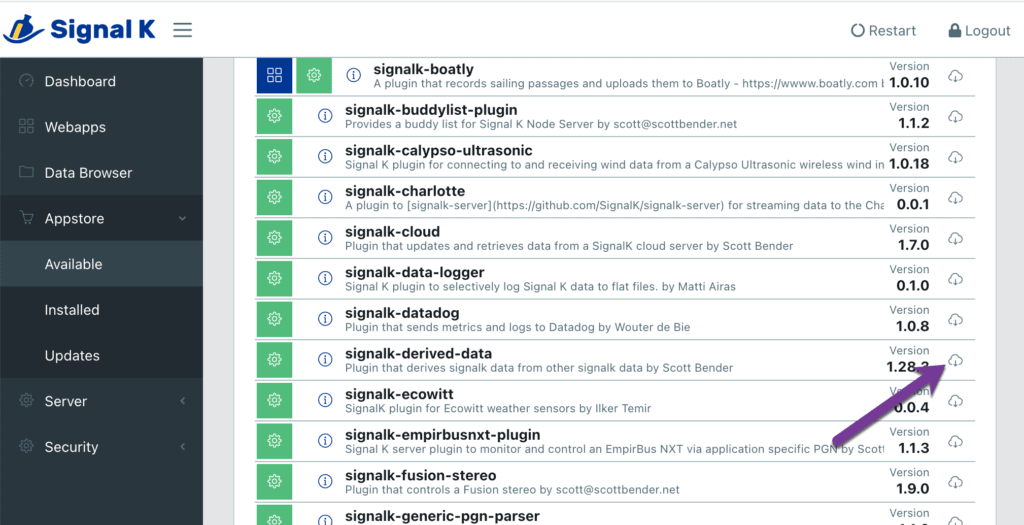
Common Signal K Plugins to Install – SeaTalk Pi SignalK Integration
Plugins are pieces of code written that extend the functionality of Signal K. They are easy to install, but require restarting the server whenever you install or upgrade one of them.
In addition, almost all plugins require some sort of configuration. Once you’ve installed one (or more), and restarted the server, you’ll need to go into Server -> Plugin Config and set any of the values you need to get things working. Usually the plugin maintainer page (the little “i” will link you to it) will help you with any details. Again, after changing these values, you’ll need to restart the Signal K server.
To install a plugin, click on the little download cloud on the far right hand side, and scroll back up to the top of the screen to see install status. You can also click on the little “i” on the left and learn more about it. Once you’re done, don’t forget to restart the server (upper right corner).
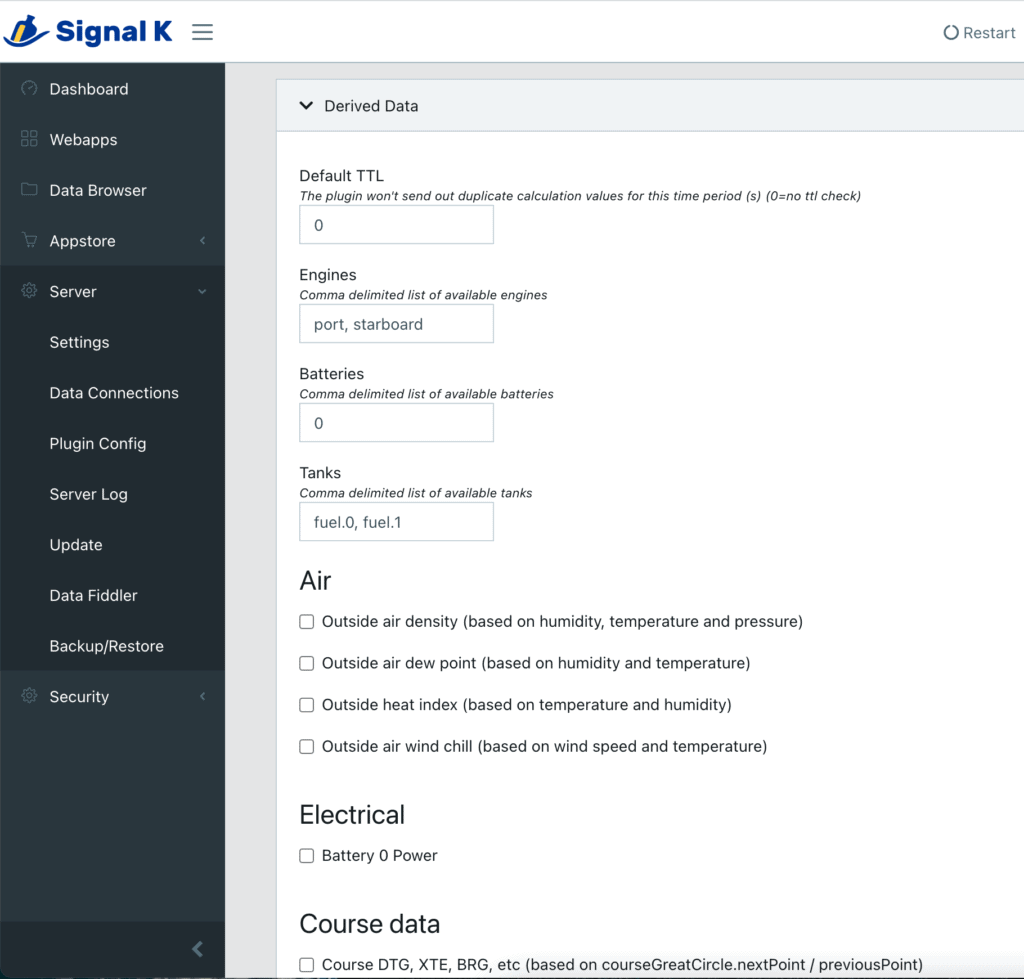
signalk-derived-data
The most important one to install is signalk-derived-data which generates other data from stuff being input into Signal K – examples include: Outside air density (based on humidity, temperature and pressure), Outside air dew point (based on humidity and temperature), tank volume, and much more. You can read all about it at signalk-derived-data.
Once you’ve installed it, there are bunch of configuration options. You can enable various items depending on what data you’re missing – for instance, if you have wind speed and outdoor temperature, but nothing on your network produces wind chill temperature values, check the “Outside air wind chill” box and restart the Signal K server. You’ll now have a calculated wind chill amount!
signalk-raspberry-pi-temperature
I install this one to keep an eye on the temp of my Raspberry Pi. My network is pretty extensive, and I’ve seen it get very hot when it is overwhelmed. This shows up as another bit of data in Signal K and you can see it in the instrumentpanel as well.
signalk-wilhelmsk-plugin
I always install this one because it has a companion iPhone/iPad application that is absolutely amazing – the plugin is only required if you have an Apple Watch. It’s written by one of the key Signal K developers and I highly recommend it as a way to see all of the data real-time from your boat on an iPhone or iPad.
You can find out more about the app at WilhelmSK.
Wrapping things up in this Installment!
What we have up to this point is a functioning installation of the Hardware and Software Components running the SignalK server. I don’t have mine on my boat yet, as stated before. I’m going to build sensors on the bench and see how and if they work.
SeaTalk Pi SignalK Integration – Part Four Conclusion
So what we have up to this point is a fresh install of SignalK server running the derived data plugin application.
- NMEA 2000 Tools – Installed and Configured
- A Pi CAN HAT Adapter – Installed and configured
- A SignalK Server – Installed and configured (Derived Data)
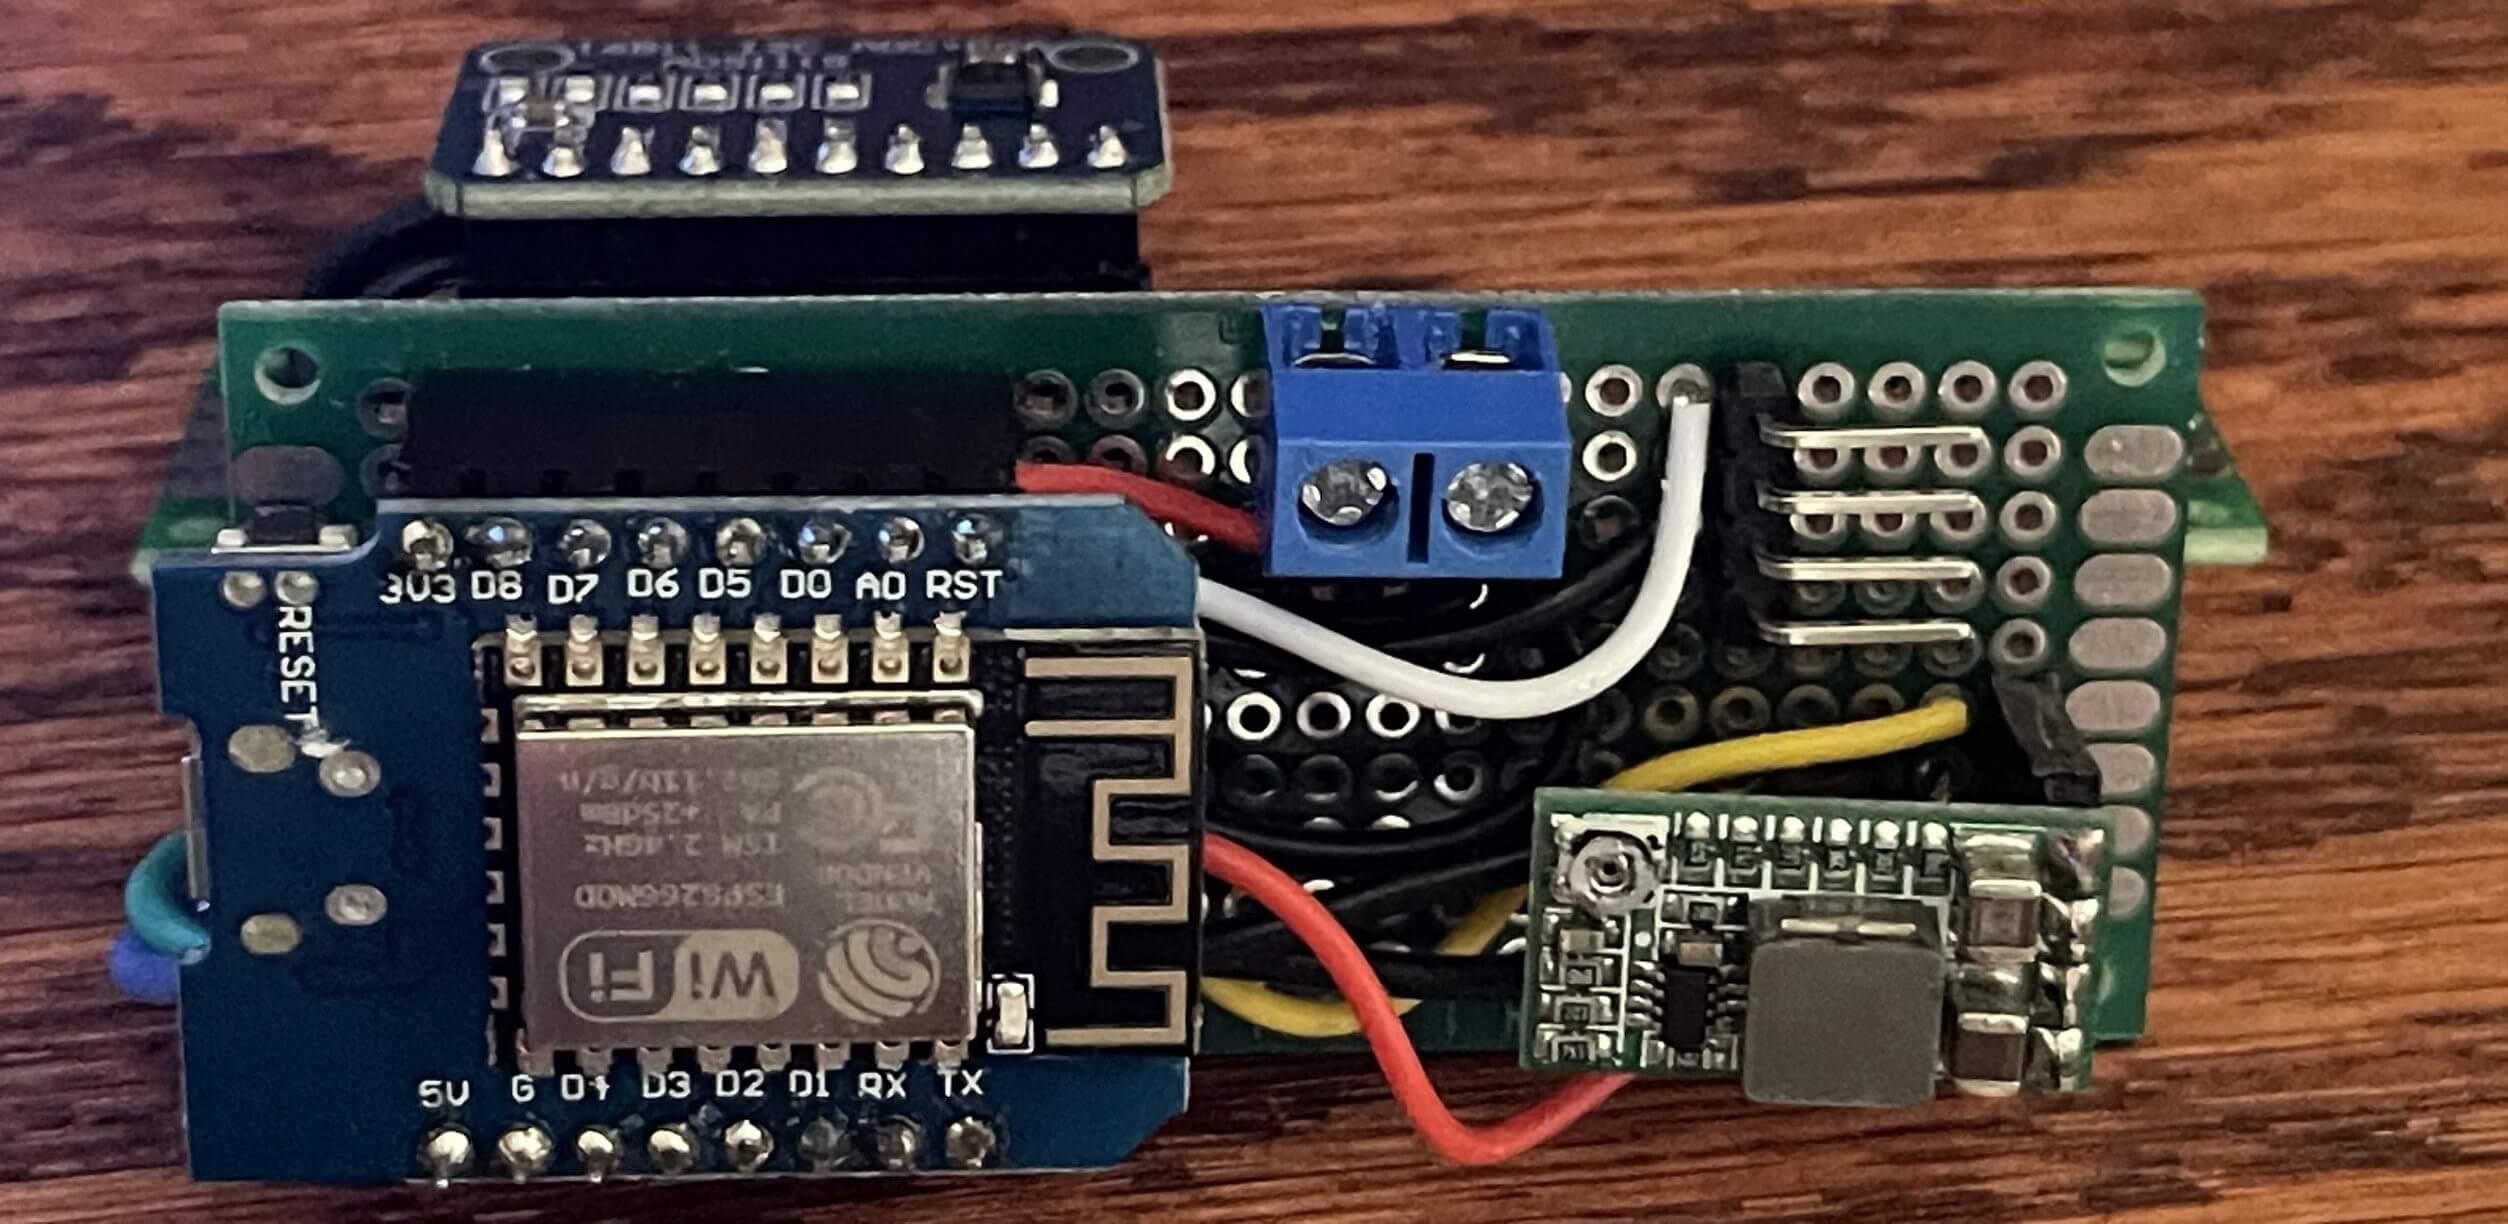
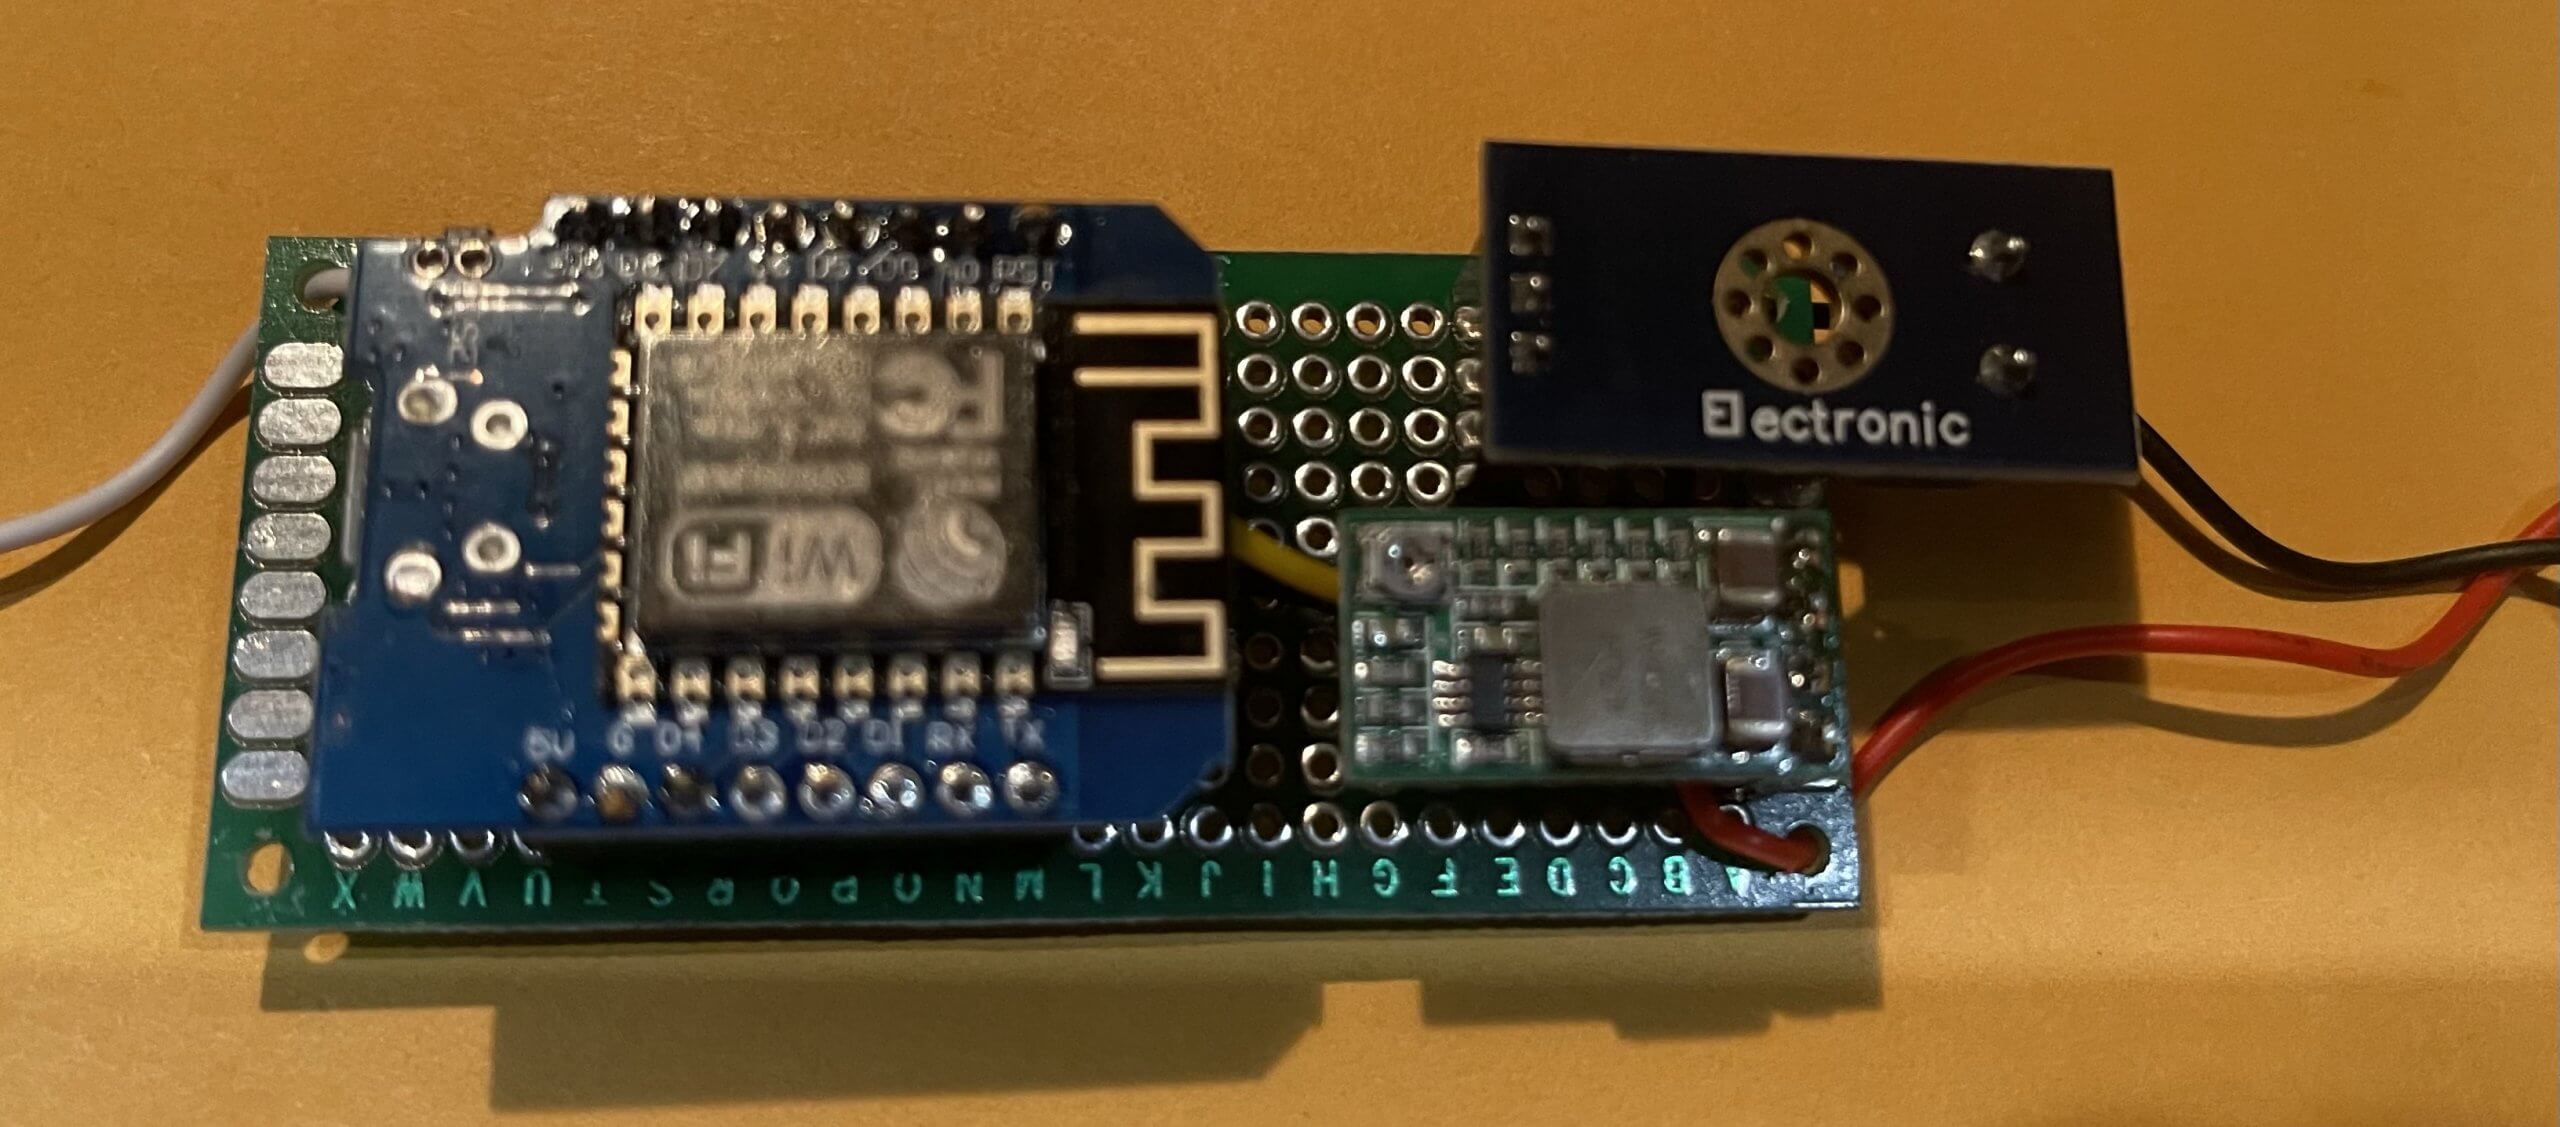
So next in the next Part of this series We will configure our 1st sensor. As stated before, I’m going about things in discrete phases so I can deal with issues that may arise in a phase. This is just how I tackle everything. Above is a preview of a module I have built. This is going to be the Port / Starboard Fuel tank sensor and battery sensor. This is the end state of this series, monitoring systems with these SOC devices.
I’ve tried to get signal to work on a new Pi4 running Buster with an attached Pican-m HAT.
I cannot get the server to start.
pi@BoatPi:~ $ sudo systemctl status signalk.service
● signalk.service
Loaded: loaded (/etc/systemd/system/signalk.service; enabled; vendor preset: enabled)
Active: failed (Result: exit-code) since Mon 2023-04-17 19:28:24 BST; 54s ago
Process: 2150 ExecStart=/root/.signalk/signalk-server (code=exited, status=200/CHDIR)
Main PID: 2150 (code=exited, status=200/CHDIR)
Apr 17 19:28:24 BoatPi systemd[1]: signalk.service: Service RestartSec=100ms expired, scheduling restart.
Apr 17 19:28:24 BoatPi systemd[1]: signalk.service: Scheduled restart job, restart counter is at 5.
Apr 17 19:28:24 BoatPi systemd[1]: Stopped signalk.service.
Apr 17 19:28:24 BoatPi systemd[1]: signalk.service: Start request repeated too quickly.
Apr 17 19:28:24 BoatPi systemd[1]: signalk.service: Failed with result ‘exit-code’.
Apr 17 19:28:24 BoatPi systemd[1]: Failed to start signalk.service.
pi@BoatPi:~ $
I’m not sure can fix this. I’ve certainly seen severel hours on it. Perhaps the above recipe needs updating or perhaps signal is broken. Any help would be gratefully received.
Hello Adrian , excuse the delay in getting back to you. I have a Pi4 on the way so I can have a lab environment. I have a virtual machine running 11 , bullseye, and it seems to run fine . I don’t have the PiCan hat obviously. I’ll look at the recipe, I know the nodejs and npm where problematic, upgrading to 1.4.1 on signalk. I also had issues with upgrading to 2.1.1.