In one of our installments, we decided to monitor battery voltages. Although I thought this was going to do it. Additionally, I decided I needed a little bit more data than just voltage. So I would like things like charge rate, discharge rate, and current draw. Furthermore, I was going to build this with an INA219 current sensor, a 500 AMP shunt, and an ESP8266.
So I hopped on to the SignalK Slack channel for some advice. After some feedback, it seems like this was going to require a lot more time, math, and some element of risk that I’m just not open to. This led me to the TBD Smartshunt, in a roundabout way.
So, pretty much everyone suggested looking a Victron and not wasting my time. So I hopped on to Amazon. Furthermore, as with all things being as they are these days, Amazon started to show me a TBD SmartShunt in addition to the Victron Energy SmartShunt. I had a choice here, so, I headed down the alternate path. You have to balance time & effort vs. cost. If you look closely, they look almost the same. The idea here is I will use two of these to monitor the main engine bank batteries. I will keep the voltage sensors for the generator and maybe in the future repurpose them for something else. What that is is yet to be determined.


Table of Contents
TBD Smartshunt vs Victron Energy
So in typical fashion why not venture off the beaten path? I might just learn something or waste a bunch of time and money. Regardless, the TBD SmartShunt is about half the price of Victron. These two devices look very similar. Additionally, The UART Connect looks very similar to the VE Direct. This looks like a UART output. Hopefully, I can get these into an NMEA 2000 message format. Worse comes to worse, I’ll just buy a Victron Smartshunt and I’ll have all the heavy lifting already done!
TBD UART Connect / VE Connect
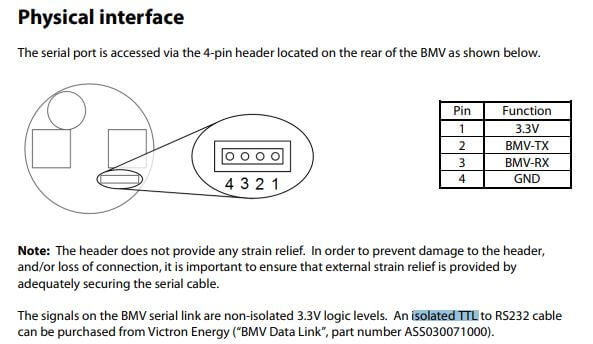
Firstly, I would say that the documentation is non-existent for the TBD Smartshunt. So I’m hoping the documentation from Victron Energy’s Smartshunt applies. I understand that the app for the Victron Smartshunt does not work with the TBD Smartshunt. Additionally, I also assume the RS232 / UART message format is also different. Per the VE Direct Protocol documentation. The VE.Direct ports have four pins:
- Positive – Not Used
- Transmit – TX – To RX on The ESP
- Receive – RX – To TX on The ESP
- GND – GND on the ESP
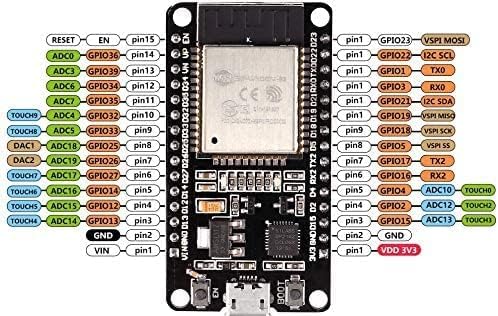
The TX and RX go (almost) directly into the UART of the microcontroller of the product. This is where I’m going to use an ESP-32. Secondly, I just need to ensure that I have the pins on the TBD Smartshunt correctly, identified.
Furthermore, the above, is an example, of the output of the VE Direct connector. This is a JST-PH on both devices. The Output is RS-232 vs UART.
TBD Smartshunt – Victron Energy VE.Direct Input Parser for SensESP
Firstly, this is a synopsis & interpretation of the information I found on SensESP/VEDirect. So, The VE.Direct serial communication interface is documented in the “VE.Direct Protocol” document available on this page (direct linking unfortunately not possible)
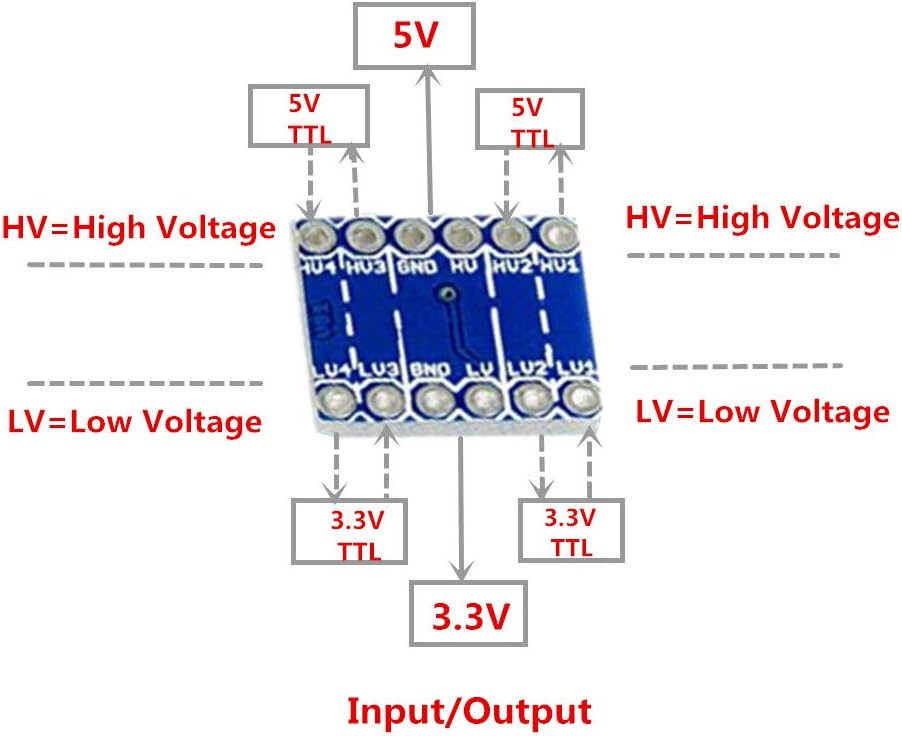
Furthermore, the physical interface is a four-pin JST-PH connector with pins for GND, RX, TX, and power, with RX and TX connecting to the product microcontroller UART. Additionally, It is important to note that the VE.Direct interface voltage level depends on the product; some are 3.3V, while others are 5V. Since the ESP32 is not 5V tolerant, a logic level converter (or a voltage divider) is required for 5V devices. In my case, I don’t have any other devices, but I’m unsure of the TBD Smartshunt voltage output.
Additionally, Victron Energy states that galvanic isolation is important because there is little protection on the Victron product itself. Providing proper galvanic isolation requires some additional hardware and is out of scope
Lastly, the serial bit rate is 19200 bps, with 8 data bits, no parity, and 1 stop bit. No flow control is used. The VE.Direct interface can operate in two modes: Text-mode and HEX-mode. This library only implements Text-mode input. This is for the Victron, and not the TDB Smartshunt
Minimal Hardware Configuration
To make a VE.Direct cable, it is possible to crimp the JST PH connection yourself. A more practical solution is to get a bunch of JST PH pigtail cables and splice the wires to a longer cable. The type of cable is not important; a suitable ethernet cable or even a flat 4-wire phone cord is fine.
So Here is what we are going to need :
- 15 PCS 4 PIN JST PH Female Connectors
- CH340N Module, TYPEC USBC to TTL Serial Port DC 3.3V/5V
- 4 Channels IIC I2C Logic Level Converter Bi-Directional Module 3.3V to 5V – Only Need for other VE Products
- 3 Pieces ESP WROOM 32 ESP32 Development Board
Connect the VE.Direct interface GND (Black) to the GND pin of the ESP32. You MUST use a logic level converter. Connect the Victron product VE.Direct TX (White) pin (via the logic level converter, if necessary) to ESP32 GPIO pin 17. Additionally, the default Tx GPIO 17 UART2 pins are denoted as Rx2 and Tx2 in most ESP32 development boards; Pin 6 =16 Pin Pin 7=17.
Wrapping things up in this Installment!
So to wrap this up episode, we have ordered a few items. Furthermore, in the next episode, we will assemble and see what data we get we get out of the TBD UART Connect. To be honest, it may be pointless, but then I will at least have the framework fo build this for the Victron Energy Smartshunt. Regardless, I really hope this inspires some of you to build something amazing!
Instead of the uart wire with the logic level adapter – use Bluetooth to collect from the tbd-smartshunt. It’s not too difficult , use gatttool and read handle 0x002d. Decoding the returned 30 some bytes is pretty straightforward (i.e. first 2 bytes are SOC %). I am using a raspberry pi to collect the data from 3 TBD smartshunts (as their app is not cool with multiple shunts)…
Thanks Dan, it’s greatly appreciated. I’ll look into it. I have two of these and possibly a third for the generator battery. Last, but not least appreciate the feedback! It will probably be the next post. Busy getting the boat ready for winter.
Hi Dan,
Can you please provide your script sample.